The recipe I followed called this, "Marmalade." I would call it jam. Rather than peeling and chopping the rind, the oranges and lemons are sliced whole, and go through several steps to soften them. We all really enjoyed the taste and texture, but the appearance is less attractive than a clear marmalade. Oh, it is pretty, but opaque-like jam.
I added two tablespoons of Campari at the end, which at least helped the colour. It certainly solved the issues I've had with American oranges being too sweet. After all the experiments over the years with orange blossom water, Angustora, and the like, a couple tablespoons of bitter orange booze accomplished what I'd been trying to capture. So good, that's sorted.
The other oddity in the recipe is adding the lemon juice at the end, before bottling. I've been preserving quite some time, but have never run across that instruction. It didn't seem to impact the pectin/gelling as it was being bottled, but perhaps there is some long-term reason for it. I should think with five oranges and two lemons it was acid enough already.
I used a jam thermometer this year, but even at 220 degrees F. I thought it needed a bit more time based on the spoon test. Perhaps it is best not to rely on a singular method of testing gelling. This did come up with just about the perfect texture, which is a nice departure from my typical marmalade soup. Or I cook it to death. Grapefruit seems more susceptible overcooking.
Overall? I loved the soft, big pieces of fruit and rind that weren't challenging to eat-the rinds practically dissolve on toast. The bitter/sweet ratio was perfect, and if someone presented this to me as jam I'd be delighted with it, but as marmalade I'm not convinced. I'm not however worried about any going to waste.
From, Sunset Home Canning:
5 medium sized oranges
2 small lemons
3 cups water
6 cups sugar
1/2 cup lemon juice
1-2 tablespoons Camapri (my addition)
Rinse unpeeled lemons and oranges (my note-scrub the hell out of 'em). Halve lengthwise, thinly slice crosswise, discarding seeds (I left a few that I fished out later as they help with gelling). Place slices in a large 8-10 quart pot, add water and press down fruit to make an even layer. Cover and let stand at room temperature 8-24 hours (I did 14).
Bring fruit to a boil, uncovered over high heat, stirring. Reduce heat to low and cook, stirring occasionally for 40 minutes. Remove from heat, cover and let stand 4 hours.
Stir in sugar, bring to a boil over high heat, and keep stirring until sugar is dissolved. Continue to boil uncovered until mixture thickens and reaches 220 degrees F. (but do a manual gel test, either a spoon or saucer). As it begins to boil down, turn down the heat as it will stick and sputter.
Remove from heat, stir in lemon juice and Campari if using.
Ladle marmalade into hot, sterilized jars, remove air bubbles and wipe rims clean. Process ten minutes in a boiling water canner (adjust times to your altitude), with a five minute cool down still in the canner after heat is off. Cool 12-24 hours before testing seals. Makes 5 pints or about 8 half pints.
Friday, December 30, 2011
Thursday, December 29, 2011
Raisin Refrigerator Relish
The recipe for these raisins comes from The Big Book of Preserving the Harvest by, Carol W. Costenbader. So far I've been pleased with the recipe format as well as the results. I have a lime vinegar sitting, but when it is ready, I'll post the results.
I know you think pickled raisins sound strange, and they do but you'll be cheating yourself out of a really excellent pickle if you let that keep you from making this. It reminds me of chutney without the onion and sugary glop. Even the kiddo liked them (you thought I was going to say, "relished" them, didn't you?). I can see these with a roast, though I served them with a salad tonight, and will probably toss them on some flatbreads with curry tomorrow. My only regret is not making more, as I expect these to go fast.
You Will Need:
1/2 cup white wine vinegar
1 1/2 tablespoons sugar
3 cloves garlic, minced
1/4 teaspoon salt
2 teaspoons fresh ginger root, peeled and minced
1/2 teaspoon yellow mustard seeds
1/2 teaspoon cayenne pepper (I substituted a teaspoon of dried red pepper flakes)
1 cup raisins
1 cup sultanas(I used all raisins)
Heat vinegar and sugar. Add garlic, salt, and remaining spices. Pour warm vinegar over raisins in a 1 pt. sterile canning jar. Cap, seal, and refrigerate. Keeps 3-5 days* in the fridge.
*That seems kind of short for a pickle, even unprocessed. Still, it is a small batch and will probably get used quickly. Any food science experts have thoughts on this?
A Traitor to my Ethnicity
-I'm having extensive dentistry done so that my teeth no longer look like David Bowie's. So far, the front four on top look awesome. I needed some fillings done, and since I was going to be sitting in the chair quite a bit over the next few months, I thought it would be a good time to make my teeth look less like that of a horse-or David Bowie. I'm sorry I didn't do this sooner, though in the past I think the technology was a bit more crude (like caps).
Now I can smile when I tell you to fuck off.
Now I can smile when I tell you to fuck off.
Wednesday, December 28, 2011
Contest!
I really like THIS project at Make and Takes for a, "Family Motto" board. I can't however come up with anything better than Mr. ETB's suggestion of, "You Can't Kill Us All. OK Fine, You Can." Better to put it to the readers.
You have until 1 January 2012 to enter your suggestions in the comments. The best one will be selected by myself. The winner will get a jar of homemade marmalade, jam or whatnot.
If you've been reading this blog for any length of time, you probably know that we're not the, "Daily Affirmation" kind of people unless it begins with, "Everyone I ever hurt...deserved it." You earn points if it makes me laugh.
Let's see what you guys can come up with.
Monday, December 26, 2011
Christmas Place Settings
When I bought two snowflake plates at the grocer in November, Danny immediately fell in love. Suspecting they would be clearenced after Christmas, I went back this morning and bought four, three piece place settings to pack away for when he leaves home. They were .74 cents each. The next place I visited had snowmen plates and bowls for .50. I bought those as well.
My plan is to pack them away with some local newspapers from our county, as print papers probably won't exist by then. Hopefully, he'll enjoy looking back and remembering the winter of 2011.
My plan is to pack them away with some local newspapers from our county, as print papers probably won't exist by then. Hopefully, he'll enjoy looking back and remembering the winter of 2011.
Sunday, December 25, 2011
Grannymar's Christmas Pudding
 That blob atop the pudding is a brandy soaked sugar cube that failed to ignite, but it was brandy soaked sugar so it isn't like anyone was complaining. Wouldn't that be a wonderful little pick-me-up to have a brandy soaked sugar cube in tea? OK, skip the tea. I was gifted a bottle of Campari for Christmas which I promptly began mixing with fresh squeezed grapefruit juice. I wonder what sugar soaked in Campari would be like? Probably would work with this pudding as it is loaded with candied slices of oranges and grapefruit. It is about as Campari-ish as a Christmas pudding can get.
This is the third year Grannymar's pudding has made an appearance at our Christmas dinner. I had fruit I candied myself last summer when cherries, apricots, and plums were in season-now I'm afraid this will become tradition. I cannot imagine a Christmas pudding with anything less. I still have a couple stashed for St. Patrick's Day. I like a suet pudding, but this butter based pudding is unquestionably the best I've tasted-and this year's was over-the-top from the fruit. And moist-I don't know how that happened as I have a reputation for over-drying puddings in the oven, or not using enough booze to keep it hydrated. I dunno, it was like some magical alignment of the universe and pudding gods got together and decided 2011 was going to be the year we all remember as the best pudding, ever. Best. Pudding. Ever.
Thanks, Grannymar for your help with another perfect Christmas pudding.
Scenes From Christmas
 Perfect toast for Christmas morning (sourdough limpa with spiced orange jelly)
 Homemade Christmas crackers with the dumbest jokes ever.
 Hope your holiday was as wonderful as ours.
Saturday, December 24, 2011

Friday, December 23, 2011
Coconut Kisses

Imagine the best part of a coconut macaroon, and the best part of a meringue-that's what these are, only better. Addictive. And sweet. So sweet your head goes all woo woo, and your teeth hurt, but you keep eating them anyway. Yeah, that's what they're like.
Adapted from, Amish and Mennonite Kitchens, Pellman and Good (I love that cookbook)
You Will Need:
3 large egg whites at room temperature
2 cups plus 1 tablespoon granulated sugar (caster sugar works best if you have it)
2 teaspoons white vinegar
1 teaspoon vanilla extract
2 cups flaked coconut
Beat egg whites until foamy, then add the sugar a tablespoon at a time. When about half the sugar is added, beat in the vinegar. You need to keep beating until they are very fluffy-a good 10 minutes. Beat in vanilla and fold in coconut.
Preheat oven to 250 degrees F. Line a baking sheet with parchment. Drop by teaspoons, or pipe through a bag. Top with something festive, or leave plain and drizzle with melted chocolate laster. I made mine large, but the recipe says you can get five dozen. I got about 18.
Bake 30-45 minutes until dry. Cool on rack.
Trifle

Because I do everything Felicity Cloake tells me to (well, except Coronation chicken).
We used blueberries frozen from last summer, cake from Danny's birthday, and blackberry jam from Thanksgiving. I enjoy using up odds and ends. We skipped the gelatine layer, though honestly, I feel like that's sacrilege. Danny can't tolerate the stuff, but I sort of have a weak spot for it.
Thursday, December 22, 2011
Sourdough Limpa Bread

The technique for this bread can be applied to other sandwich loaves with excellent results.
You Will Need:
Sponge:
1 cup fed sourdough starter
2 cups water
2 cups dark rye flour
Mix together and let stand 8-12 hours.
Final dough:
All of sponge
2 teaspoons salt
1 tablespoon sugar
1 tablespoon fennel seeds
Grated zest of 1 large orange
Enough strong flour to make a dough that is tacky, but not soaking wet.
Cover with cling film and let rest 1 hour.
Over the next four hours, give the dough about 2 folds each hour. More or less-see how the dough is responding.
Transfer dough to a well-buttered loaf pan (I have a large Pullman pan, but 2 regular loaf pans are OK as well). Cover lightly with cling fil and set in fridge until doubled. This can take 8-24 hours, again, it just depends on the strength of your starter, temperature of the fridge, etc.
Preheat oven to 375 degrees f.
Remove bread from fridge while the oven preheats. Bake 20 minutes, then rotate pan. Bake another 20 minutes. At this point, you'll need to watch the bread and check the internal temperature. I like my loaf breads around 200 degrees F. but if it seems too light, or too dark, trust your judgment and adjust the timing/temperature. A thermometer is helpful, but careful attention is important as well. After you've baked for a while, you learn to trust your eye.
Cool completely before slicing.
Charred Carrot Soup

This soup comes from the 1987 edition of The Best of Food and Wine. It was quite a bit of work, but certainly a different sort of soup than I typically make. I used a food mill rather than a food processor and I put the soup through a fine sieve after. I suppose that might have made it seem like more work (and grating carrots on a box grater) but I am unwilling to give up counter space to a food processor i will use only occasionally. I rarely used mine, and when it broke, I was happy enough to live without it. My point is, the recipe is "doable" without modern appliances.
You Will Need:
1/2 tablespoon vegetable oil
5-6 medium carrots (about 3 cups) peeled and shredded
2 shallots, chopped
2 garlic cloves, chopped
1/2 teaspoon thyme
1 small Idaho potato (a floury-type potato) peeled and chopped
3 1/2 cups rich vegetable (or chicken) stock
1/2 cup heavy cream
1 tablespoon red wine vinegar
1/4 teaspoon salt (adjust according to the saltiness of your stock)
1/4 teaspoon pepper
1 tablespoon unsalted butter, softened
1 tablespoon chopped parsley for garnish
Preheat a 12 inch cast iron skillet over high heat for 5 minutes. Add the oil, then the carrots. Stir to coat. Cook the carrots, stirring frequently until they are partially charred-about 15 minutes. Reduce heat to moderate and add the shallots and garlic. Cook until the shallots are softened-about 2 minutes. Add the potato and stock and bring to a simmer. Cook until carrots and potato are very soft-about 15 minutes.
In a food processor (or a food mill) puree until smooth, then force through a fine mesh sieve (yes, that will be time consuming, so plan accordingly). Return soup to a saucepan and add the cream. Add the red wine vinegar, extra salt, and pepper as desired. Stir in the butter, and serve the soup hot, garnished with parsley.
Sourdough Pizza with Onions and Anchovies

I use the term, "Pizza" rather loosely. There's a bit of cheese, but only about half a cup-hardly any at all by my household's standards. There's a whole hell of a lot of bread though. And onions. The egg was just being silly, though it turned out OK. I don't eat this sort of thing, but as everyone tucked-in and I didn't hear complaints, I'll assume it was good. I hope they liked it as they'll be eating it again tomorrow.
For the Onions:
2 large, sweet onions (about 1 1/2 lbs.) minced
3 tablespoons olive oil
3 cloves garlic, minced
1/2 teaspoon dried thyme
1/4 teaspoon salt
1/4 teaspoon pepper
1 bay leaf
Pinch of ground cloves
Cook all over very low heat until very soft-about 1 hour. remove bay leaf, and chill until needed.
For the crust:
Sponge:
1 cup fed sourdough starter
2 cups water
2 cups strong flour
Mix well. Let stand four to five hours.
Final dough:
To the sponge add:
1 teaspoon instant yeast (you can skip this, but it will take longer)
1 tablespoon granulated sugar
2 teaspoons salt
Enough plain flour to make a dough that is tacky but not soaking wet. Mix all together and cover with cling film in same bowl. Let stand 30 minutes.
After 30 minutes, knead dough adding flour if needed to keep it from sticking-only add what you absolutely need. Cover and let rise until doubled.
Stretch out dough and place in a very well oiled pan. Preheat oven to 450 degrees F. If you are doing a heavy topping, it helps to pre-bake the crust for 20 minutes. Remove crust from oven and add toppings. Return to a much hotter oven-around 475-500. Bake until topping is nicely browned. If doing an egg, add it in the last even or eight minutes.
Wednesday, December 21, 2011
Kreplach-Meatless

It wouldn't be Hanukkah around here without a bowl of vegetarian kreplach soup. This year, I made the filling from a combination of chickpeas and butter beans-I also made them larger. Honestly, they are a pain to make, which is why I've set kreplach aside as a holiday treat. I suspect they enjoy them more for the scarcity as well.
The basic recipe is HERE.
Tuesday, December 20, 2011
Basic Birthday Cake Tutorial
People who bake frequently often have their foolproof recipes they count on to produce predictable results. Sure, I enjoy trying new things (geez, get your minds out of the gutter) but when it comes to something as important as a birthday cake, experience has taught me to stick with the familiar. My familiar is a rich, gold cake that goes out at night and does my bidding. It is often observed in the company of a butter/shortening decorator's icing.
I can see you making faces at the mention of shortening (you shouldn't do that as your face will stay that way you know). The shortening helps keep the icing spreadable, and it also keeps the finished cake from melting at room temperature. There are fancier butter creams that do not rely on shortening for this effect, and certainly many will taste better. Again, I opt for reliability, not butter cream that will curdle, and cause me worry trying to remedy it. Besides, it has an entire cup of butter in addition to the shortening, so it isn't like you're going to die of some sort of butter deficiency disease. Wait until you hear what goes into the cake.
When making cakes such as the one I made for Danny's Birthday that require cutting into shapes, it is important to have something solid that will cut cleanly. My son does not like pound cake (fool, I know) which would be my first choice for a cake construction material. My second is this rich cake that has butter, an ungodly number of egg yolks, and milk. It has a delicious, rich crumb, yet it is somewhat dense making it easy to cut in sharp lines. I always make the cake a day ahead of decorating so it can firm up, tightly wrapped in the fridge as cold cake cuts much better. Contrary to what every cookery book I own tells me, I find a serrated bread knife does an excellent job trimming and slicing this cake, provided you don't use too much of a sawing motion.
Something I've learned over the years is that extra cake eliminates the, "What if I screw-up?" anxiety. Bake more than you think you will need (but do it as separate batches as the recipe does not double well) and freeze any extra tightly wrapped in wax paper and cling film. It makes a wonderful trifle, emergency cake (what, you're too classy to have a cake emergency?") or gift in a hurry (defrost and decorate). Too much cake is rarely a problem (really, when was the last time you heard someone complain of too much home baked cake? If you spend time with people that complain about an abundance of cake, you obviously need new friends) but too little when you've already started decorating is a pain. Bake ahead, and screw-up all you like secure in the knowledge that you have, emergency cake.
Filling: I don't bother. If you feel compelled to fill an already rich, decorated cake, stick with something like jam. If you're making layers, then I suppose there's an obligation, but for a sheet cake cut into designs, I consider it madness to split the cake and fill it. For a layer cake don't go for a heavy custard filling as it may squish out the sides making decorating difficult. I really like jam-it stays where you put it. A layer of melted chocolate that will harden again is also interesting. Whatever you do, keep the filling thin. You're not going to listen, are you? No, I know you too well, and can see the weeping lemon curd. Don't say I didn't warn you.
The recipes:
For the icing:
1 cup butter
1 cup vegetable shortening
2 teaspoons flavouring
3 cups sifted icing sugar (possibly more or less)
Tint
Cream the butter and shortening until light. Beat in flavouring. Add the sugar a half cup at a time until you have an icing that is a spreadable consistency. If you use liquid food colour rather than gel, you may find it thins the icing a bit, so you'll need to experiment. If you should make the icing too thick, thin it with a small bit of cream added a tablespoon at a time. The icing will begin to dry out as the air hits it, so if you are affixing something like jimmies or pearl sugar, do so before the frosting sets to ensure it adheres well. It will not turn hard like royal icing, though it can easily be piped on for a decorative effect. I would use extra icing sugar to make it stiffer.
Technique:
Make a crumb coat of thin icing on the top and sides of the cake (I start with the sides, but that's me). Return the cake to the fridge for at least 20 minutes for the icing to set. This is a step well worth doing as the finished decorating looks smooth, and neat. I like tidy cake. I also like slide rules, advanced maths, Linnaeus, and things that order the universe in a way that seems pleasant without turning into my mother and colour coding the linen cupboard, or ironing the dusting rags. Obviously my world is not organised around punctuation. It is a cake for heaven's sake, not some bloody curry you threw together from vegetables rotting in the bins, and a tin of coconut milk. It really ought to look like you made some sort of effort. So crumb coat, OK?
For the Cake:
This will make a 9x13 or two 9 inch layers
1/2 cup butter
1 2/3 cup granulated sugar
5 large egg yolks (yes, that is quite a bit. Freeze the whites for later use) well beaten
2 1/2 cups sifted cake flour (use the cake flour for this, not plain flour)
2 1/2 teaspoons baking powder
1 teaspoon salt
1 cup milk (I used 2 % because I had it, but anything will do)
2 teaspoons vanilla extract ( or any flavouring you like)
Preheat oven to 350 degrees F. with rack in centre position. Butter and flour cake pan(s). Cream together the softened butter and sugar until fluffy. Beat in the eggs. Sift the dry ingredients together and add alternating with the milk and extracts. Don't over beat, but you do want to make sure it is mixed thoroughly. Bake 25-30 minutes for layers, 35-40 for 9x13. Cake should test done when it passes toothpick test and begins to pull away from sides of the pan. Coll 10 minutes in pan on a rack, then remove from pan carefully and cool completely on rack.
Put it together:
I like to make room in the fridge for two large baking sheets. Do this ahead. Cover the sheets with wax paper to catch any drips of icing, crumbs, etc. As you will be working in stages (you are going to do a crumb coat, correct?) it is easier to know exactly where the cake is going between steps. Baking sheet in hand is no time to discover you have a dozen jars of chutney and relishes that must be moved before the cake can chill. You probably don't need that jar of Branston pickle from 2006, so use this as an opportunity to bin it. Sure, your spouse/partner will insist it is still good, but you need the room for cake. Branston is the devil anyway.
After the frosting has set, lightly drape a piece of wax paper over the cake (or a cake cover if doing layers that will fit) and let it firm up at least half a day before serving. It cuts best for serving cold, though it does tend to taste better when closer to room temperature-with the exception of summer heat. Shortening may be designed to withstand the flames of hell (or a summer in the American South) but butter gets unpleasant after an hour or so in high heat.
Remember, even if the cake gets a bit stale, you can cut off the icing and make a perfectly acceptable trifle from it. Toasted slices of cake drizzled with Golden Syrup make a rather nice breakfast as well. Do not waste cake (god, I think I shuddered even typing "waste" and "Cake" in the same sentence).
Happy Baking.
Danny's Birthday
 First presents (very, very early)
 oooh, a super powerful magnet for science and a Jacob's ladder toy.
 Yeah, I made the Periodic table from iced butter cookies. Someone had to.
 A thermometer.
 Detail of cookies. I'm glad I went with edible marker rather than trying to pipe all the stuff in royal icing. Good call, that.
 Danny requested a cake shaped like a battery. I thought it should have a lightbulb as well. What the photo does not show are the candy crystals that made the lightbulb appear glass-like. The battery has silever and gold crystals as well.
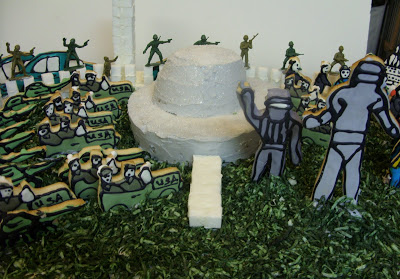
 Yeas. I bought him $60.00 worth of plastic soldiers so he could recreate the Charge of the Light Brigade. No, we didn't get all of "The 600." Damn close though. These models are really well made-the horses stand and the soldiers stay put atop them. You get what you pay for, in replicas anyway.
 The quilt is difficult to photograph due to the shimmer of the organza top. What I did was make a fish tank scene with apliques, rick rack, sequins, etc. I covered it with the sheer organza and sewed it to the top of the quilt. Danny loves it, as do I. It wasn't terribly difficult to make, though it did require some planning.
 Can you see the fish?
We finished the day at the Union Pacific Railroad Museum in Council Bluffs. Actually, that's not true as we stopped at the Hy-Vee in the Mall of the Bluffs for cheese (They have an outstanding selection of cheese ends from exotic cheeses). As it is Danny's birthday, he got to select the cheese-Leicester, and Emmanthaler. Both excellent choices. I bought a small Canadian cheddar that I wish I'd purchased more of. That stuff was so good it makes me wonder why we bothered invading Iraq when we could have invaded Canada. I mean, they have oil and cheese. I don't know why the Pentagon never rings and asks for my opinion.
Anyway, a wonderful time was had by all, and my baby is now a very grown-up seven years of age.
Monday, December 19, 2011
So What Do You Do With Cake Scraps?
 "Vaguely French" snowmen.
I mixed cake scraps with leftover frosting and formed balls. After chilling them for an hour, I melted white chocolate and then rolled each ball in sugar crystals and/or nonpareils. The noses are tiny pieces of orange flavoured licorice twists, and the hats are Junior mints.
I thought about posing the snowmen gazing down at the baby Jesus from Danny's Nativity set, but Mr. ETB thought that would be tasteless. *shrug*
Beetroot-a Few New (to me) Uses

I roasted a batch of thinly sliced beetroot tossed with olive oil and coarse salt. I pulled half the slices out whilst still pliable, but left the remainder to bake until crisp. The soft beetroot went into a fritata, and the chips went atop a salad. Both were well received. This makes a reasonably quick, uncomplicated dinner with somewhat more nutritional value than the typical holiday season meal.
Turnip Greens

I made a few changes to THIS recipe (veggie broth, different peppers) but the result was a batch of turnip greens that is easily in the top 10 things to come out of my kitchen-ever. Turnip greens don't usually get the sort of reaction from my family that these did. Finally, a recipe for greens that doesn't require a bunch of ham or bacon fat.
Wednesday, December 14, 2011
Christmas Music
I'm not going to win any "Mummy of the Year" awards, but Danny really got a kick out of THIS.
I baked about a million cookies this week (well, nearly) including the now completed Periodic Table. I'll post it when I assemble it for the Birthday party on Tuesday. I have about three nights of sewing left to complete the quilt, but it is giving me a great excuse to watch movies. I can't very well read as I stitch, so I've used this time as an opportunity to watch, and re-watch things I wouldn't otherwise have time for. So far this week, I've watched:
Life of Brian
A Christmas Story
A Child's Christmas in Wales
Lawrence of Arabia (the 4 hours director's cut)
Medium Cool
Failsafe
No idea what I'm watching tonight, but I have a large stack of videos I bought when the local rental place closed, so there's quite a selection. Black Robe was a cheerful movie, maybe I'll re-watch that one.
OK, gotta go finish the kid's birthday present.
Easy Meal Ideas for Busy Holiday Evenings

Tonight-mini cheese souffles. I served these with herbed rice, and spinach. The whole dinner was ready in about 45 minutes. Only about 15 minutes being active prep time. I have better things to do than cook for my family...wait...oh hell, you know what I mean.
Use 4 large, or 6 regular sized ramekins. I've had this recipe copied down in a notebook for years. I no longer recall where I found it, but it has been in regular rotation at our house for some time now. This is one you'll want to copy down and keep as well. At least I think you will.
You Will Need:
1 1/2 cups milk
1/2 teaspoon dried thyme
3 tablespoons butter
1/4 cup plus 1 tablespoon plain flour
2 large egg yolks, room temp.
1/4 cup finely grated Parmesan plus extra for ramekins
1/2 teaspoon kosher salt
Pinch nutmeg
Pinch pepper
4 large egg whites, room temp
Pinch cream of tartar
3/4 cup lightly packed grated cheese (I used Swiss and cheddar)
Preheat oven to 350 degrees F. Butter the ramekins well. Coat lightly with parsemasan, then place on a baking sheet and chill until needed.
Heat the milk and thyme until steaming. In another pan, melt the butter. Add the flour and cook over medium heat until it begins to foam. Whisk in the warm milk and continue cooking until it thickens-about 2 minutes. Remove from heat and cool slightly before beating in egg yolks, remaining Parmesan, nutmeg and salt/pepper.
Beat the egg whites with a pinch of cream of tartar until stiff. Fold 1/4 of it into the souffle base. Fold in remaining egg whites, then toss cheese on top and fold it all together. Pour into ramekins and bake 30 minutes until puffed and golden. Serve immediately.
Persimmon Pudding

You need the regular, old persimmons for this rather than the Fuyu. The persimmon should be so ripe that it is really nearly liquid being held together by the thinest remainder of skin. Sometimes they crack-that's OK it means the fruit is ready. Of course, if you're lazy, persimmon pulp in a dish dotted with butter and brown sugar can go under the broiler for a minute resulting in a pretty impressive dessert for minimal effort. This pudding is pretty simple as well. The recipe may be halved, but as it reheats beautifully in the microwave, you'll probably want some around for a quick dessert.
You Will Need:
1/2 cup butter
1 cup granulated sugar
2 large eggs
2 cups sieved persimmon pulp
1 teaspoon vanilla extract
1 teaspoon cinnamon
1 teaspoon bicarb
2 cups buttermilk
2 cups plain flour
Handful of raisins (optional-but why in the world wouldn't you want raisins...unless you're one of those freaks that don't like raisins).
Preheat the oven to 325 degrees F. Grease an 8x8 baking dish.
Cream the butter and sugar until light. Beat in eggs one at a time. Stir in persimmon, vanilla and cinnamon. Add the baking soda to the buttermilk and add alternating with the flour. Pour into prepared baking dish and bake 45 minutes or until set. I served mine with mincemeat ice cream and those incredible truffles I make each year.
Friday, December 09, 2011
Pannetollen
 (updated) here it is. I'll get the recipe up tomorrow.
-When you can't decide between pannetone and stollen. Danny named it, I have it rising on the kitchen counter. Film at eleven.
Basically, what I did was make a rich, buttery, eggy dough studded with fruits and fennel. As it is so dense with raisins, cherries, and peels I shaped it like a stollen (flatten into an oblong, coat with soft butter, sprinkle with vanilla sugar and fold over) which ought to help prevent any sinking issues. I clarified some butter to brush it with when it comes from the oven, and I will dust it with icing sugar. You know, a Pannetollen.
I'll be icing the transition metals of the periodic table of cookies tonight as well. Let's hear it for Tungsten!
Sort of related-if you are a local reader and would like some mincemeat, drop me an email. Every year I swear it will be a small batch and well...so yeah, get in touch if you'd like some.
Thursday, December 08, 2011
Truffles-N-Stuff

I call these my, "mincemeat pirogies" as I find it easier to shape them like dumplings than fuss with tart pans. You also get a better ratio of filling to pastry. Not the prettiest pastry I've made, but still delicious. This year's mincemeat has pears rather than apple. I think I prefer it. I skipped the suet as well. Along with the pastry, I made a batch of mincemeat ice cream. That was very well received. In short, it was a rich vanilla custard ice cream with mincemeat stirred into it at the last. I think it would work well with pumpkin ice cream too.

The truffles are 13 ounces of bittersweet chocolate, 1 cup heavy cream, 2 tablespoons corn syrup and 1 teaspoon instant coffee. Place the chocolate and coffee in a bowl. Heat the cream and corn syrup until steaming. Pour over chocolate and coffee. Let stand 5 minutes, then whisk smooth. Pour into a pan and chill 4 hours. Roll into balls and decorate as desired. Store in the fridge.
Wednesday, December 07, 2011
Tri Focals
Consider me officially old-I picked up my new spectacles today-tri focals. I would have spent the afternoon wallowing in self pity, but then I broke a tooth and reminded myself that I still have my own teeth to break.
I can't decide if I'm nauseated from the new lenses, or the pain medication for my tooth. This did not stop me from rolling out, and baking the cookies that when decorated, will become the Periodic Table for Danny's Birthday. I have just under two weeks to pull this all together, which I cannot do sitting in the dentist's chair. Maybe I just shouldn't eat until after Christmas.
The quilt is about 80% completed. This will be the 7th Birthday quilt I've made him. He said I can quit when he's 18. That was kind, don't you think?
I cannot believe I broke a tooth on a Tic-Tac. And I wear tri focals.
Get off of my lawn you damned beatniks.
Monday, December 05, 2011
Cinnamon Twists-Betty Crocker Picture Cookbook 1950

Yes, I'm back to the Betty Crocker cookbook again-what can I say? This is my, "Holiday" cookbook.
These are so easy to make...well, they just are. Perhaps not as simple as smacking a tube of prepared dough against a counter and squeezing out the icing packet, but certainly doable, and much less expensive.
These rolls are a one-rise, which is nice as you don't have to screw around trying to figure out if the bulk of dough has doubled or not. The recipe is old, and calls for compressed yeast. That simply isn't available where I live, so i adapted the recipe for use with regular granulated dry yeast.
You Will Need:
1/4 cup warm water
2 1/4 teaspoons granulated dry yeast
(Mix together and let proof)
1 cup sour cream
3 tablespoons granulated sugar
1/8 teaspoon bicarb
1 teaspoon salt
1 large egg
2 tablespoons soft shortening (I used margarine)
3 cups plain flour
Filling: 2 tablespoons soft butter
1/3 cup brown sugar
1 teaspoon cinnamon
Frosting:
1 cup icing sugar
A few drops of water
Beat until smooth
In a large saucepan, heat the sour cream until lukewarm. Remove from heat and stir in the soda, salt, and yeast dissolved in water. With a spoon, beat in the egg, shortening, and flour. Beat until smooth.
Turn onto a floured board and give it several folds until firm. Roll out into a 24x6 oblong. Spread the dough with the soft butter. Sprinkle half the dough with the filling, then fold over. Cut into 24 strips 1 inch wide. Taking each end in your hands, twist in opposite directions. Lay on greased pans and let rise until light-about 1 hour. Meanwhile, preheat the oven to 375 degrees F.
Bake 12-15 minutes or until golden. Remove to a rack over a baking sheet and glaze while still hot.
Homemade Grape-Nut-ish Taboulleh (sort of)

These aren't actual Grape Nuts, and this sure as hell isn't authentic taboulleh. That said, it makes a lovely salad that everyone will marvel at once you tell them what it contains. It shouldn't work, but it does. As I had made so much of the homemade cereal, I thought I'd give this a try. I'd seen it mentioned before, but it always sounded so terribly wrong, in so many ways that I never considered it. Well, that was before I had a couple pounds of cereal sitting in my kitchen.
I can't vouch for this recipe made with the store bought cereal, but everyone went (grape) nuts for this version (sorry, I had to, but as compulsions go, bad jokes are a pretty mild form of the affliction).
2 large tomatoes, skinned seeded, and chopped
1 1/2 cups Grape Nuts-ish cereal
1 cup fresh parsley, finely chopped (I had the flat kind, but I'm not a parsley snob, use what you like)
1/2 small red onion, finely chopped
1 clove garlic, finely chopped
1/2 cup fresh mint, chopped or 2 tablespoons dried mint
Juice of 1 lemon
1/4 cup olive oil
Salt/Pepper
Mix it all together and chill. It should get stirred a few times before serving, and should be permitted to marinate at least 4 hours.
Cheese Filled Baked Crepes with Pumpkin Sauce

The only real trick to making crepes that I have to share is permitting the batter a proper rest before using-two hours at the very least. This is a rather plain crepe batter, not the sort one would use for dessert crepes.
Honestly, you can make this dish as filled pasta, or even a lasagne if you find crepe making daunting. I do not have a crepe pan, but have always had good results using my well-seasoned 20 year old cast iron pan. I use the tiniest bit of oil or butter at the start, and then never need to add more as I make the crepes. That is a common mistake-using too much fat in the pan.
You will need to make sure your pan is hot enough first. A drop of water should, "skip" across the pan when it is sufficiently heated. Cast iron tends to distribute heat well and retain it-medium is usually hot enough for crepes. You'll have to learn to judge your pan, but that's why the first crepe often fails-after a while you'll get the hang of it and there will no longer be, "test crepes."
The crepes may be prepared well ahead and any extras may be frozen for future use.
For the crepes:
1 cup cold water
1 cup cold milk
4 large eggs
1/2 teaspoon salt
2 cups plain flour
4 tablespoons butter melted and cooled
Whisk together the water, milk, eggs, and salt. Whisk in 1 cup of the flour, then the butter, then the remaining flour. You will need to keep whisking until it is smooth and free of lumps. You may use a blender, or hand mixer for this, but really a whisk works fine and why wash a blender jar if you don't need to?
Chill the batter and let it rest at least two hours before preparing crepes. This recipe makes about 10 medium sized crepes.
For the cheese filling:
1 cup drained, 4% milkfat cottage cheese
1 cup grated Swiss cheese
2 large eggs
Salt/pepper
Mix all together well and keep chilled until ready to use.
For the Sauce:
1 15 ounce tin of pumpkin puree (unflavoured)
2 cups vegetable broth
1 tablespoon butter
1 teaspoon ground sage
1/2 teaspoon dried thyme
Salt/Pepper
1/4 cup sour cream
Combine pumpkin, broth, butter and spices in a saucepan. Cook over medium heat until butter melts and sauce is warm but not boiling. Remove from heat. Whisk in sour cream.
Topping:
3/4 cup finely shredded Parmesan
Put it together:
Preheat oven to 350 degrees F.
In a 9x13 pan, place a bit of the sauce in the bottom to thinly coat. Take a prepared crepe and fill it with a couple tablespoons of cheese filling. Roll and fold it into a square, and place in the pan. Continue until you run out of space, or ingredients. Any extra crepes can be frozen. Cover with remaining sauce and top with shredded cheese. Cover tightly with foil, and place on a baking sheet. BAke 30 minutes, then remove foil and bake 20-25 minutes longer until cheese is browned and bubbly. Let stand a few minutes before serving.
Saturday, December 03, 2011
Fig Bars

The snow has been falling since early morning, and as evening arrives we still can't see the road from the frontroom windows. This is my favourite sort of day. True, we did have plans for today that ended up scrapped, but instead we baked, listened to Christmas music, and conducted a few science experiments with magnets and electricity. I poked about in the attic today and located the belt to a dress that has been missing for at least ten years-thankfully, I still own the dress. I suppose it can take a major snowstorm to act as a reminder of all the things to be done at home.
Those figs my husband purchased for me finally found their way into baked goods. Oh, I've eaten my share of them straight from the packet (I adore figs) but I couldn't very well let them all disappear without making fig bars first.
This is a vintage recipe from the 1950 Betty Crocker Cookbook. I noticed the Nut Free Mom is resorting to the same volume today for nut-free gingerbread houses. Really, for seasonal treats that adapt easily to omissions or whatever you happen to have on hand, that cookbook cannot be beat. The recipes are simple enough for a novice, and many of them feature recipes for both larger and smaller batches. It might not be the flashiest cookbook I own, but it is one of the most reliable.
I know you will see shortening in the recipe and wonder if butter would work better. Ordinarily, I like to err on the side of butter, if you will. In this case, as with tortillas, and other things that need to remain soft, go for the shortening. The bars will avoid becoming crisp, will last longer, and it will save you some money as well. Thanks to my friendly butcher ("hi friendly Hy-Vee at 90th and Center butcher!") who placed the oddball order for me, I have about ten pounds of beef suet in my freezer-and I was tempted, but as Danny is vegetarian and does not make exceptions for a suet pudding (fool) I went ahead and used vegetable shortening. I also have a freezer stocked with venison again ("hi friendly husband's boss who goes hunting") so yes, there's some sausage in our future.
I made the filling a day ahead, and it would have been wonderful just as a spread for toast. I substituted orange juice for the lemon and part of the water but I'll note that in the recipe. I really love figs with orange. Because I had Greek string-style figs (they are no longer on an actual string, but are packaged to appear as though they are. *shrug*) the skins tend to be somewhat tough. I cut the figs and scooped out the pulp, which is a bit of work. I do feel it was worth it, but I suppose I could have simply run the finished filling though a food mill. You could leave the skins of course, but these really are on the thick and tough side compared to Mission figs.
Make the dough up to a day ahead and be warned-it is infuriatingly soft and difficult to work with. Worth it? Of course, but be prepared to do a bit of patching. I rolled mine out larger than the recipe called for making slender long bars shaped like biscotti. I'll post the original directions which make a more Newton-like" sized biscuit. Store them in an airtight tin, or crockery jar. They last beautifully.
You Will Need:
For The Dough:
1/2 cup soft shortening
1 cup granulated sugar
2 large eggs
2 tablespoons thick cream
1 teaspoon vanilla extract
2 1/2 cups plain flour
1/4 teaspoon bicarb
1/2 teaspoon salt
Cream shortening and sugar together until light. Beat in eggs. Stir in cream and vanilla. Sift dry ingredients together and mix in. Chill dough, tightly wrapped in cling film several hours before using.
Meanwhile, make the filling:
1 1/2 cups cut-up figs (scraped out pulp if using tough skinned variety)
1/2 cup granulated sugar
1/2 cup water (I used 1/4 cup each water and orange juice)
2 tablespoons additional orange juice (or lemon)
Cook slowly stirring constantly until thickened-about 5 minutes. Cool. Makes about 1 pint.
Preheat oven to 400 degrees F. Grease two large baing sheets. Roll out 1/2 the dough 1/8 inch thick. Cut into 4 large strips 3 1/2x12 inches. Spread 1/3-1/2 cup filling on each strip lengthwise covering only half the strip except for a 1/4 inch edge. Lift this edge up and stick it to the filling. Quickly flop the uncovered half strip over the filling, folding it under at the edge. Seal the two edges securely. With a sharp knife, cut into bars 2 inches long. Place 1 inch apart on baking sheet. Bake 8-10 minutes or until lightly browned.
I did not shape them this way, and I don't see any reason you couldn't make them round with a biscuit cutter and top with another circle that you crimp. You could also do large circles and fold them over into crescents. Use your imagination, but be warned that getting that dough 1/8 inch thick takes some skill (and a stocking net on the rolling pin).
Cool on racks, then store in tins.
Thursday, December 01, 2011
Nut-Free Lebkuchen

I've made these before, but I found a few changes in this year's attempt have been a great improvement in the overall results. The original recipe came from my 1950 edition of The Betty Crocker Picture Cookbook. Over the years I've found other ways to replace the nuts and this year I made use of ground porridge oats, crystalised ginger, and raisins. While they may not be strictly traditional, they are still wonderful. As the lebkuchen are so attractive, be sure to make a hole in the top of a few before baking as you'll want to hang them on the Christmas tree.
I don't own an oblong cookie cutter (I mean, really-does anyone?) so I fashioned a template from a stiff piece of cardboard, and cut around it with a sharp knife. As I do most of my oddball decorated cookies this way, I'm pretty skilled with the technique. If you really feel it is beyond manageability. use a rectangular cutter instead-you don't lose points or anuthing if your Lebkuchen don't have rounded corners. You can go ahead and insert a German joke there if you're feeling inclined.
You Will Need:
1/2 cup honey
1/2 cup molasses (or dark treacle)
3/4 cup dark brown sugar
1 large egg
1 tablespoon lemon juice
1 teaspoon grated lemon rind
2 tablespoons finely chopped crystalised ginger
2 3/4 cups plain flour
1/2 teaspoon bicarb
1 teaspoon cinnamon
1 teaspoon cloves
1 teaspoon allspice
1 teaspoon nutmeg
1/3 cup cut-up candied citron
1/3 cup quick cooking porridge oats (or regular ones pulsed for a few seconds in a coffee grinder)
Raisins to decorate
Glaze as follows at end of recipe
Mix together the honey and molasses in a saucepan. Bring to a boil (watch it, it foams) and remove from heat. Cool thoroughly.
Mix into the molasses/honey the brown sugar, egg, lemon juice and rind. Stir in ginger. Sift together the dry ingredients and add to the wet mixture. At the last, stir in the citron and oats. Mix well and roll dough in cling film tightly. Chill overnight. This is important as it is a very soft dough and will be frustrating bordering on impossible if not well chilled.
Preheat oven to 400 degrees F. Grease two or three large baking sheets. Flour a work surface generously (trust me, you need plenty of flour for this). Roll out a small amount at a time keeping the remainder chilling. The cookies should be about 1/4 inch thick. Place the Lebkuchen about 2 inches apart on the sheets, place a raisin in the centre, and one in each corner. Press slightly to secure them. Bake 10 to 12 minutes or until a finger indentation does not remain when pressed. Upon removing from the oven brush immediately with glaze and carefully remove to a rack to cool. Store in an airtight crock or tin with a slice of apple to mellow the cookies. They should be ready to eat in a week or so (the hard cookies transform into an almost cake-like texture). Be sure to change the apple slice every day so it does not mould.
Glaze:
Boil together 1 cup granulated sugar and 1/2 cup water until it strands (230 degrees F. Remove from heat and quickly whisk in 1/4 cup confectioner's (icing) sugar. If icing gets sugary as it cools, re-heat slightly and add a bit of water .
Makes about 3 dozen lebkuchen.
Gingered Pear With Chocolate Turnovers

This has been a fantastic year for Bartlett pears. I haven't had a bad one yet, and I'm determined to preserve some before the season ends. This dessert was met with amazement, but trust me, it is really no effort to prepare. I have a theory that coarse sugar atop most baked goods convinces people that the pastry is somehow more impressive than it is. I won't tell if you don't.
On a trip to Big Lots a few weeks ago, I was able to buy Baker's chocolate semi-sweet chunks (the exact same item as the stuff in the box, already chopped) for $1.18 per 12 oz. bag. With the eight ounce box now averaging over three dollars, I felt rather pleased with my find. I can make hot chocolate in under a minute now that I no longer need to get out a knife and chop. That may prove a bad thing-ask me how much weight I've gained at the end of winter. As I now have a seemingly endless supply (well, it seems that way) of chocolate, I've been using it a bit more generously that I typically would-in a pear turnover, for example.
I'll leave the pastry recipe to your tastes. I used an all-butter pie crust recipe that does not have eggs or vinegar. It is durable yet not so heavy that it looses the flakiness one likes in a turnover. I could see using purchased (or homemade) puff paste, or even (gasp) the crap that comes in a tube at the supermarket. Heresy, I know. I can put a pastry crust together in minutes, but I also recognise that not everyone is blessed with poor circulation and freezing cold hands. Arthritic old people make the best pastry-that is a fact. No it is, shut up.
The filling is what you need me to disclose. This is essentially the filling I use for apple turnovers substituting chocolate for the raisins. You could of course add raisins, which would be delicious with the chocolate, but I'd reduce the sugar a bit. As it is, the turnovers aren't overly sweet, but pears can quickly get overwhelmed by sugar. I also used a squirt of lime juice rather than lemon to keep the pears light. Sure, lemon would have been the obvious choice, but I had half a lime sitting in the fridge for a week and I wanted to get my .20 cents worth out of it. The taste was non-existent in the finished product-but the pears retained a lovely colour.
Finally, there is the matter of the pan. The turnovers will leak-they always do as it is simply the nature of this sort of pastry. I butter my sheets, but parchment would make for easier clean up if you care about that. As the filling is sugar and cornstarch, it comes off pretty easily with a soak in hot water, but I thought I should warn you about the alarming amount of ooze on the pan. I let mine cool on a rack, over another pan to catch any additional drips.
You Will Need:
Pastry for a 2 crust pie
3 large, ripe pears, pared (ha ha, they're already pears-sheesh) cored, and sliced
1/2 cup coarsely chopped semi-sweet chocolate (bittersweet would do as well)
Juice of half a lime (or lemon)2 tablespoons butter, cut into tiny pieces
1/3 cup of sugar
1 tablespoon cornstarch (cornflour outside of the US)
Butter a large cookie sheet. Divide dough into 4 parts. Roll each out into a square about 1/4 inch thick (more or less).
Prepare filling by combining pears, chocolate, lime juice and butter. Toss together sugar and cornstarch and mix well into pears.
Mound filling in centre of each square and fold over. Seal by crimping with a fork (they'll leak anyway). Make a slit in the top to vent. Place on buttered sheet and chill 20 minutes.
Preheat oven to 425 degrees F.
Before baking, brush turnovers generously with heavy cream and sprinkle with coarse sugar (or regular granulated if that's what you have).
Bake about 30 minutes or until golden. Cool on racks, or serve slightly warm. Makes 4 very large turnovers (one can easily feed three people, or two greedy ones. OK, one extremely greedy individual can probably polish off an entire turnover...but I would never do that.)
Subscribe to:
Posts (Atom)