Tuesday, December 19, 2006
Thursday, December 14, 2006

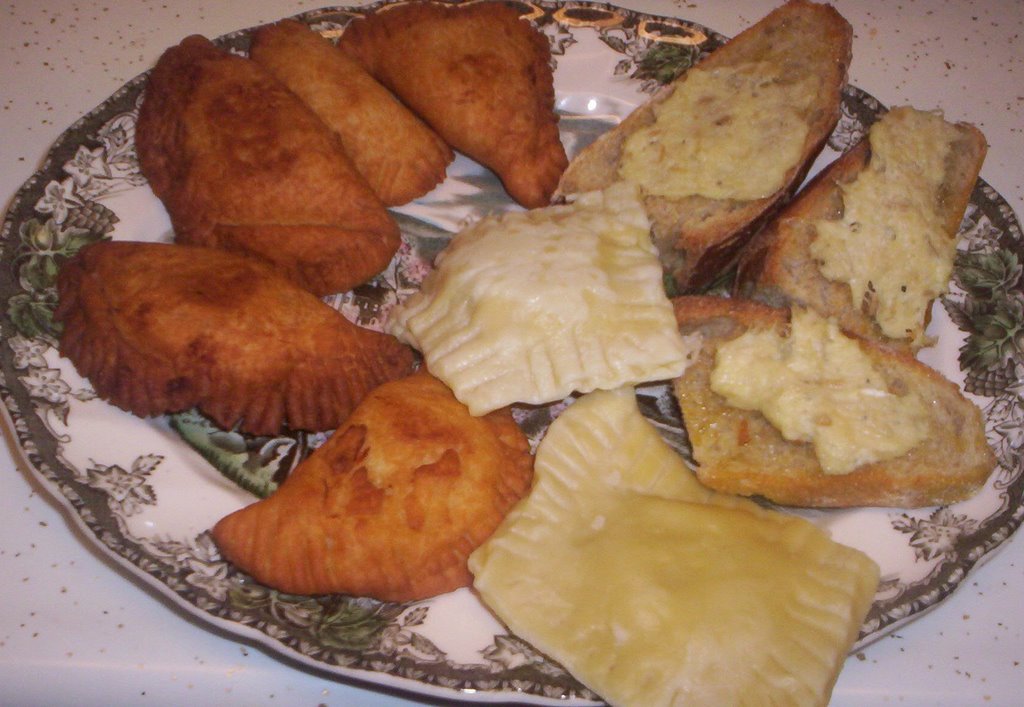
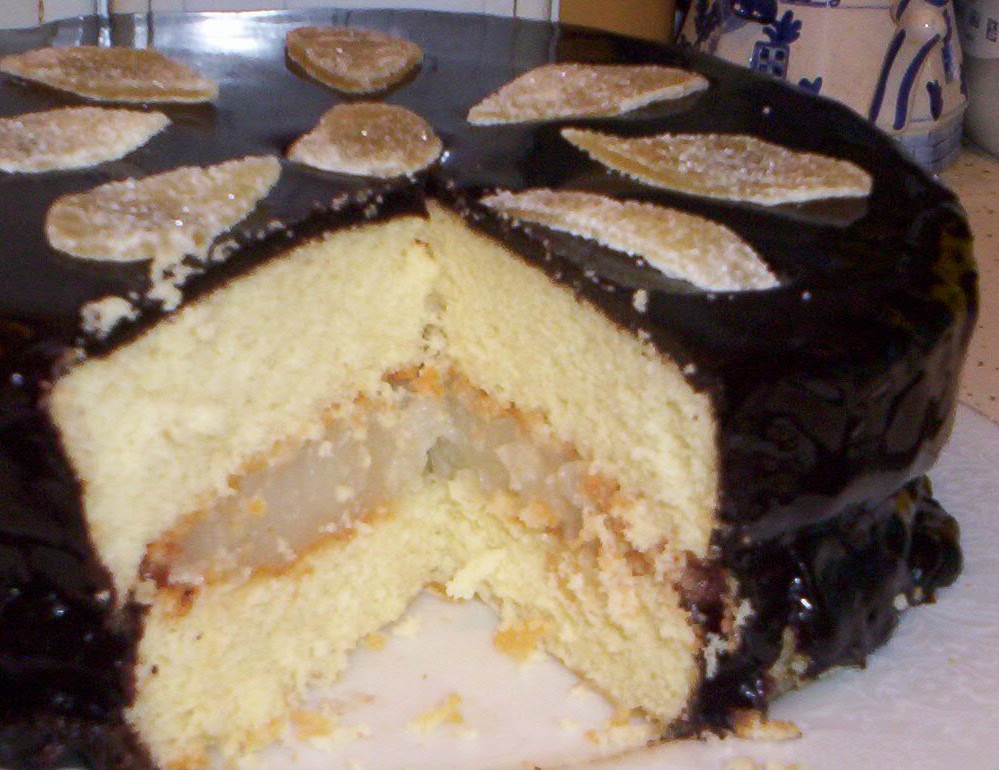
Pineapple Danish
This is a moderately difficult recipe best saved for a day when one feels ambitious. The filling may be prepared ahead.
For the dough:
1 3/4 cup milk
2 packages dry yeast (4 1/2 teaspoons)
1/4 cup warm water
1/3 cup sugar
1 1/4 cup unsalted butter
3 beaten eggs
1 teaspoon ground cardamom
1 teaspoon salt
6 cups sifted all purpose flour
Heat milk to lukewarm. Do the same with water. Add yeast to water. Let stand a few minutes and then stir to dissolve. Add yeast to milk with sugar, 1/4 cup of the butter (melted) eggs, salt and cardamom and 2 cups of the flour. Beat well. Add remaininmg flour and knead until smooth adding more if too sticky. Place in a buttered bowl and cover. Let rise until doubled in bulk (about 1 hour). Punch down and roll into a rectangle. Knead remaining cup of butter until smooth. Form into a flat square and place atop the dough, folding each side over it. Press edges to seal. Give dough a half-turn and repeat. Wrap dough in plastic and chill 15 minutes. Roll, fold and chill three more times being careful not to over-chill the butter as it will get hard and break through the dough.
Roll the dough out 1/8 inch thick and cut as desired (I did crescents as they are simple to manage). Fill and place on a greased cookie sheet. Chill at least two hours. Pre-heat oven to 425 degrees F. (reducing it to 350 as soon as the tray is in oven). Brush pastry with a beaten egg and bake 15 minutes or until browned. Cool on racks.
Makes 2-3 dozen rolls depending on size
For the pineapple filling:
1/2 cup sugar
3 tablespoons cornstarch
1/2 teaspoon salt
1 cup crushed pineapple, well drained
3/4 cup pineapple juice
1 tablespoon butter
1 teaspoon lemon juice
Bring to a boil and cook one minute longer, stirring constantly. Chill before using.
*note-I used fresh pineapple because I had it on hand, but it didn't provide much juice so I also needed to boost it with tinned pineapple juice (a staple at our house anyway).
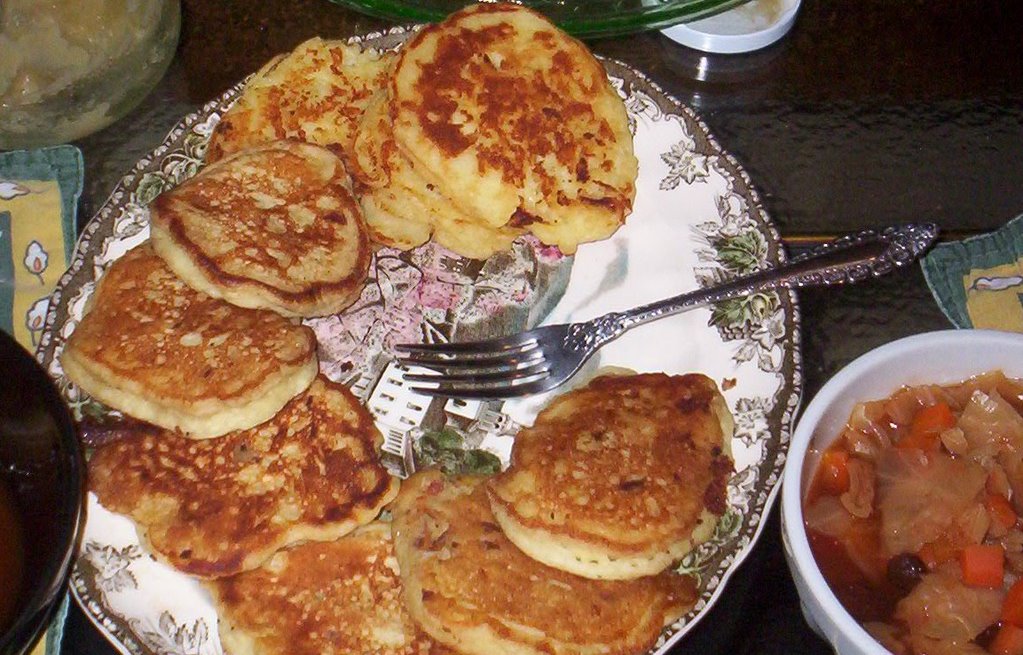
Boxty
We had leftover mashed potatoes, and my husband requested boxty for the following evening. Personally, I don't care for it. My mother did sort of a strange version of it that was even worse as it relied on oil rather than butter. Still, I went ahead and made them, and the boys enjoyed them.
You Will Need:
1 cup mashed potatoes
1 cup grated potatoes (squeezed dry)
1 cup all purpose flour
2 teaspoons baking powder
2 teaspoons salt
2 eggs
milk to mix
butter to fry
Sift dry ingredients together. Add potatoes and beaten eggs. Add enough milk to make a batter. Drop by spoonfuls on a well buttered pan and cook over moderate heat a few minutes each side. Serve hot with extra butter.
Tuesday, December 05, 2006
Gingerbread
These spicy gingerbread cookies were a real hit with my son Danny (his pop liked them too).
You Will Need:
1/3 cup soft shortening
1 cup brown sugar
1/1/2 cups mild molasses
1/2 cup cold water
7 cups sifted all purpose flour
1 teaspoon salt
1 teaspoon allspice
1 teaspoon ginger
1 teaspoon cloves
1 teaspoon cinnamon
2 teaspoons baking soda dissolved in 3 tablespoons water
Mix together the shortening, brown sugar and molasses. Add the cold water and stir. Sift dry ingredients together and add. Lastly, add the dissolved soda. Chill the dough well (overnight is best). Roll out thick and cut as desired. Grease a baking sheet (or use parchment) and bake in a pre-heated 350 degree F. oven for 12-15 minutes depending on thickness. Cool on racks. Decorate as desired. This is quite a bit of dough and will make about 18 gingerbread men.

Buttermilk Clusters
The recipe for these rolls may be found HERE, at The Fresh Loaf.
A few observations:
-I needed much more water to proof the yeast (using dry, active yeast). It took about 1/4 cup of water to dissolve it.
-The amount of buttermilk was increased by about 1/2 cup.
-This was challenging to knead by hand using bread flour. I really had to fight it.
-The first rise took over two hours, though the house is a bit on the cool side.
-I baked two from the recipe using a casserole dish and a souffle dish.
Still, the rolls were well worth the effort, and very impressive to bring to the table. I topped mine with bran flakes. We ate one tonight with soupand I froze the other for another night. I'll let you know how it defrosts.

Sunday, December 03, 2006
Candied Peel For Jenn
You will need:
-Peels of 2 large grapefruits or 3 large oranges
-Water
3 cups sugar
Cover peel with cold water. Bring to boil and cook until tender pouring off and adding fresh a few times. Drain. With a spoon, scrape out the white part of the peel. Cut with a sharp knife or scissors into strips. Make a syrup by heating 2 cups sugar with 1 cup water. Add peel and cook over low heat until peel has a clear,candied look. Remove peel, a few strips at a time and roll in granulated sugar. Cool on rack.
If you have leftovers, dip some in bittersweet chocolate.
Tuesday, November 21, 2006
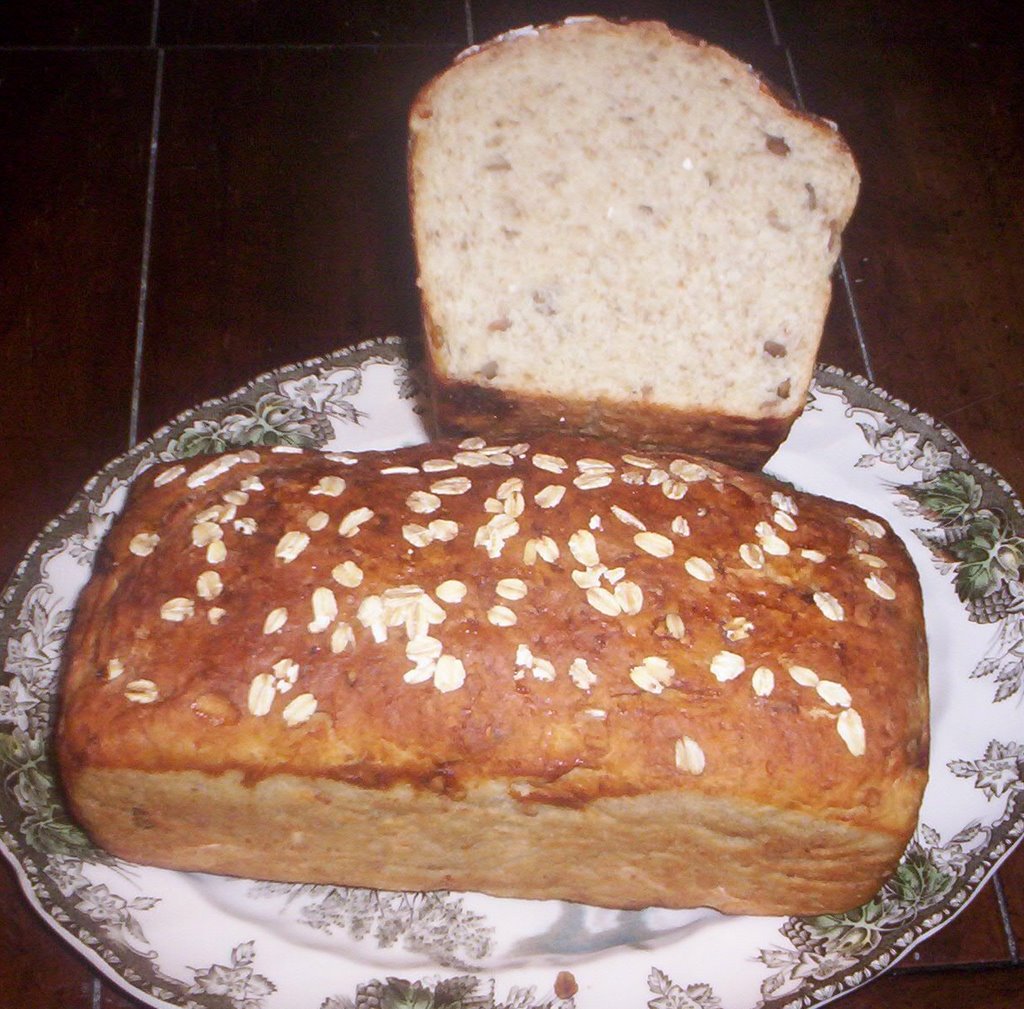
Oatmeal Bread With Sunflower Seeds
This is a very heavy, moist oatmeal bread. Certainly, the recipe could be made omitting the sunflower seeds and wheat bran. Quick cooking oats would also be a suitable substitution. I like to brush the tops with a mixture of equal parts molasses and water and then dust them lightly with a bit of oatmeal-but this would work just as well rubbing a bit of margarine on the loaves as they come from the oven (for a softer crust). This bread makes wonderful toats.
You Will Need:
2 ¼ teaspoons granulated dry yeast
½ cup lukewarm water
1 cup old fashioned oats
½ cup whole wheat flour (I used whole wheat bread flour)
½ cup brown sugar or molasses
1 tablespoon salt (less if using salted sunflower seeds)
½ cup sunflower seeds (more or less to taste)
3 tablespoons wheat bran
2 tablespoons butter or margarine
2 cups boiling water
5-6 cups bread flour
Dissolve the yeast in warm water and let proof. In a large mixing bowl, combine the oats, whole wheat flour, brown sugar, salt, butter, sunflower seeds, and wheat bran. Pour on the boiling water, and stir. Cool to lukewarm, and add yeast. Mix in half the flour and then gradually add the rest until the dough is smooth and no longer sticky. Place in buttered bowl and let rise slowly until doubled (about 2 hours).
Punch dough down and shape into loaves. Place in very well buttered pans. Let rise a second time until almost doubled in bulk (about 45 minutes). Brush with water and molasses, and dust lightly with oats. Bake in a pre-heated 350 degree oven for 30-40 minutes or until bottom sounds hollow when rapped with knuckles. Cool on rack.
This bread had a pretty short shelf-life because it is so moist, it tends to go mouldy after a few days. Placing it in the icebox will help preserve it.
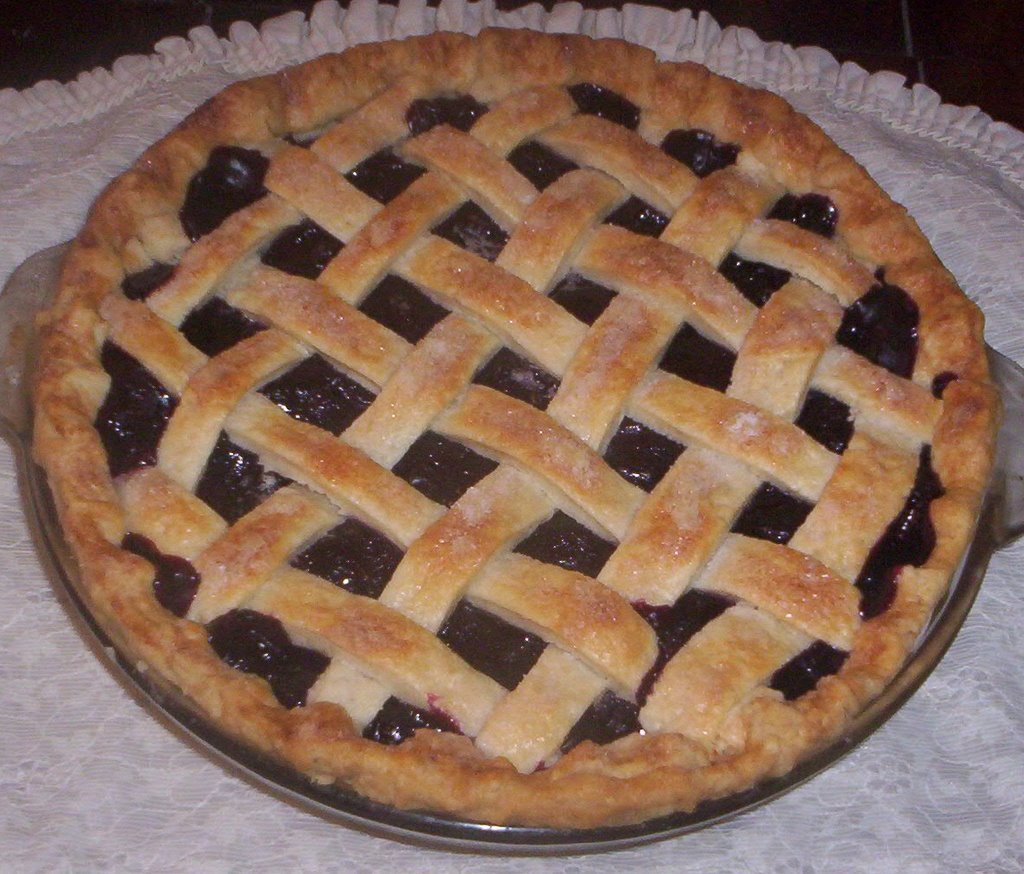
Cherry Pie
For this pie I made use of frozen cherries (it is November, you know). I suppose my primary bias against tinned cherries is the cost, though I suspect the results would be similar. If you decide to use tinned cherries, I’d dramatically cut down the cooking time in cornstarch-perhaps adding them as the mixture begins to thicken.
For the crust, I used my standard recipe which contains no sugar and is made from vegetable shortening without any buter. If you decide to use a part-butter crust, brush the inside with an egg white first to give it some extra stability and to reduce the soggy factor.
For the crust:
3 cups all purpose flour
1 ¼ cups solid vegetable shortening
1 teaspoon salt
1/3 cup very cold water
1 egg
1 tablespoon vinegar
Sift flour and salt in a large bowl. Cut in shortening. Beat egg in water and add vinegar. Add to flour/shortening. Combine and let stand a few minutes before rolling out.
For the filling (9” size)
¾ cup sugar (more or less depending on the sweetness of the fruit)
3 ½ tablespoons cornstarch
¾ cup water
4 (generous) cups frozen cherries (I used dark, sweet variety)
1 tablespoon butter
1 teaspoon vanilla (or 1 teaspoon almond extract)
¼ cup heavy cream
granulated sugar for dusting
Mix sugar and cornstarch in a large heavy pot and gradually add water until dissolved. Add fruit. Heat over medium heat (don’t over-do it or the mixture will quickly scorch) until thickened. Remove from heat. Add extract. Pour into pie shell, dot with butter, and top either with a lattice crust or using cut-outs (can be prepared ahead of time-and in the case of the lattice, really should be). Very carefully, brush the cream onto the lattice taking care not to drip onto the pie. Sprinkle with sugar and place in the oven at 400 degrees F. for ten minutes. Reduce heat to 350 degrees F. and bake until browned checking every five minutes after an initial twenty. Mine took about forty minutes total, but ovens vary. I also used a glass pie plate.
Cool completely before slicing (this will take a good six hours-I’m not kidding, that stuff gets scalding hot).
Friday, November 03, 2006
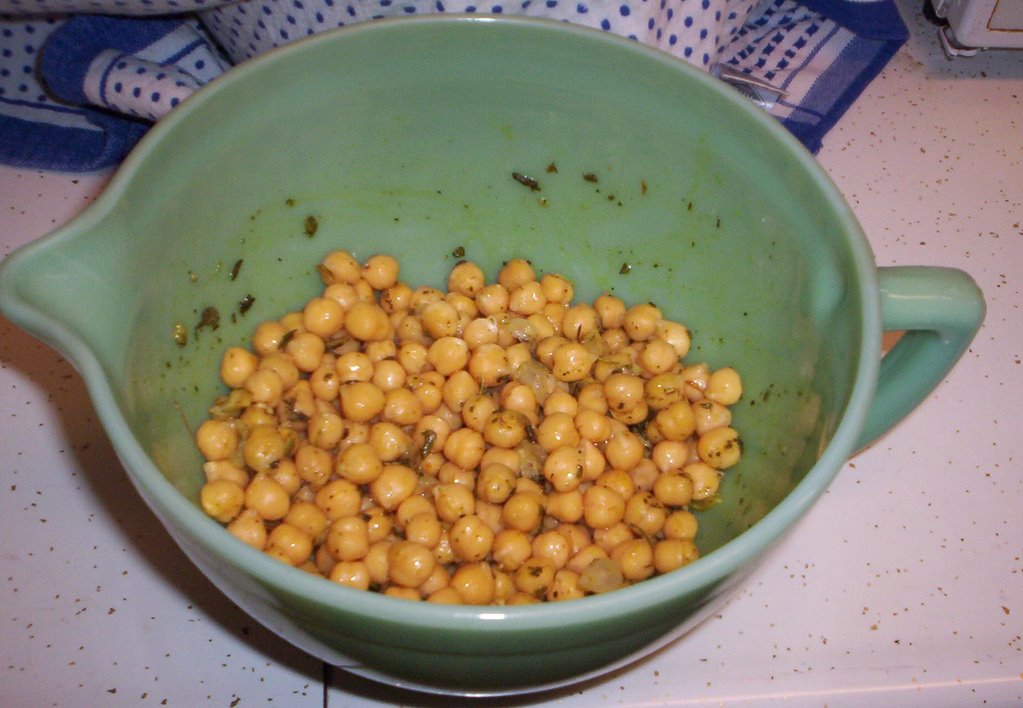
Chick Pea Salad
This is the best dish I make. Really, that’s not exaggeration. Everyone that tries it, loves it. The recipe was from the newspaper food section a million years ago, and I’ve made some changes such as substituting dried sage for fresh-but basically, it was intended to be simple to prepare.
You Will Need:
3 tablespoons olive oil
8 fresh sage leaves (or dried sage that you rub yourself)
2 cloves garlic, crushed
¼ teaspoon salt (more if preparing chick peas from dried)
¼ teaspoon pepper
1/8 teaspoon turmeric
¼ teaspoon thyme
pinch of cinnamon
2 tins chickpeas, drained and rinsed
1 teaspoon lemon juice
Heat oil with sage and garlic over medium heat in a frying pan, taking care not to burn the garlic. Heat about three minutes or until fragrant (and it will be fragrant). Stir in other spices. Add chick peas and remove from heat. Stir well and sprinkle with lemon juice. Serve warm, or at room temperature.
Then, sit back and accept the compliments.
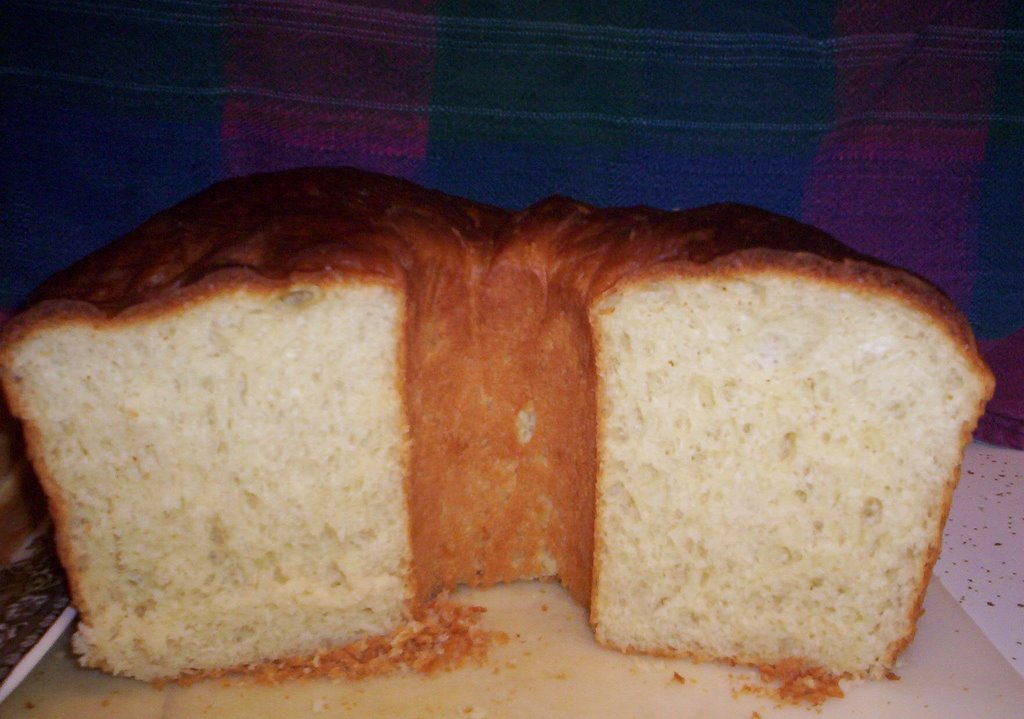
Sally Lunn and Black Bean Soup Recipes

This was my first attempt at a Sally Lunn, and it was fantastic. Since my stand mixer is waiting for repair, I’ve been trying breads that don’t require quite as much kneading and batter bread is as simple as it gets.
A month ago I purchased the tube pan with a false bottom for about a dollar and have been waiting for the perfect opportunity to use it. I’m pleased to say that the bread came away from the pan with little effort, and it cleaned up quickly and simply.
The crust was buttery and crunchy while the inside was light and flavourful. In terms of simplicity, I cannot think of a less challenging bread. The recipe that follows comes from Beard on Bread, which I find myself returning to after many years. Most of the recipes are adaptable for bread flour but I made the Sally Lunn with all purpose and it worked well. After baking artisan breads for so long, it is a nice change to do a more delicate type of loaf. I served the bread with a dinner of black bean soup served over rice with a dollop of seasoned, mashed pumpkin.
For the Bread:
2 ¼ teaspoons active dry yeast
1/3 cup sugar
½ cup lukewarm water
½ cup lukewarm milk
1 stick butter (unsalted) melted in milk
1 teaspoon salt
3 eggs
3 ½ -4 cups all purpose flour
Combine yeast, sugar and warm water in mixing bowl and let proof. Add milk, butter, salt and stir well. Add eggs and blend well. Using a wooden spoon (I don’t know why, but that’s what Beard suggests) add the flour in small amounts until you have a stiff but workable batter. Cover the bowl and let rise slowly (took about 2 ½ hours here) in a cool place until doubled in bulk. Beat it down (again, with the wooden spoon) for about a minute. Scrape into a very well buttered tube pan (9 or 10 inch) and cover again, letting it rise until it has reached the very top of the pan.
Preheat the oven to 375 degrees F. and bake 40-50 minutes until the top is dark and sounds hollow when rapped with knuckles. Turn out of pan and cool on rack. Serve warm or cold (easier to slice cold).
For the Black Bean Soup:
1 package black beans (rinsed, sorted, and soaked overnight)
5 large carrots (diced)
4 bay leaves
1 large onion (chopped)
4-5 cloves crushed garlic
2 tablespoons cumin
1 tablespoon chilli powder (more or less to taste)
4 chicken bouillon cubes (you could of course use broth if you have it handy-be sure to adjust for more salt)
1 teaspoon black pepper
2 tablespoons olive oil (use the inexpensive type for this)
1 cup frozen corn (tinned ok, but soak to get rid of salt)
(*optional-1 small tin of tomato paste, a tablespoon of chipotle sauce, small cubes of boiled potatoes)
In a large pot, cook the beans by covering well with water, bringing to a boil and then immediately reducing to simmer. Cook with lid slightly tilted to vent for about two hours. Drain.
Using the same pot (why dirty another one?) add about six cups of water to all ingredients except for the corn and olive oil. Bring to a boil and again reduce to simmer for at least an hour but as long as three. When carrots and onions have all but fallen apart, strain, reserving liquid. Put the solids through a food processor until smooth. Return to pot. Slowly, add enough of the broth to get a nice consistency we prefer our soup on the stew-like side, you may prefer to thin it down a bit). Add the corn and olive oil and re-warm before serving. I serve this in a bowl over rice (brown works well for a hearty meal) with a dollop of roasted and mashed pumpkin that has been seasoned with garlic salt and olive oil.
This is one of my 22 month old son’s favourite meals-we call it “chunky chew”. I even made-up a song about it (doesn’t everyone sing to their children during meals?)
“The Chunky Chew Song”
Oh the baby likes to eat his chunky chew
Oh the baby likes to eat his chunky chew
Yes he eats it every day
And he always says, “ok!”
Oh the baby likes to eat his chunky chew
Chew! Chew! Chew!
Yeah, all right, go ahead and laugh, but he eats his vegetables. You don’t want to know what I have to do to get him to eat oatmeal…
Monday, October 23, 2006
Meatless Pot Pie-Cheap-O Easy Version

This meatless pot pie is a terrific budget stretcher. If you’re like me, there are always a couple carrots and a small handful of frozen vegetables lying around waiting for a use. I make this pie with whatever I have on hand (this week it was carrots, frozen lima beans, tinned corn and dried onion). This is one of the few times I will recommend using tinned soup for cooking as it just works so well. Don’t add additional salt though-the soup more than takes care of that.
You will need:
2 pie crusts (top and bottom)
1 egg yolk and 1 tablespoon water for wash
3 tins condensed potato soup
1 tablespoon dried basil
½ teaspoon pepper
½ teaspoon thyme
mixed vegetables to total about 2 cups (use whatever you have on hand-frozen need not be cooked, otherwise boil until soft if using fresh)
1 tablespoon dried onion
1 teaspoon dried minced garlic
4 strips imitation bacon prepared according to directions and crumbled (don’t overcook the soy products).
Line a pie pan with the bottom crust. Preheat oven to 375 degrees F. Mix soup, spices and veggies together, Add fake bacon last. Place on top crust. Decorate and vent as desired. Brush with egg wash. Bake for about 45 minutes checking every 5 minutes after twenty (it will vary quite a bit depending on the style of crust you make).
Let stand five minutes before cutting and serving. I always serve mine with a spoonful of Dijon mustard.
Cranberry/Orange/Coconut/Raisin Loaf
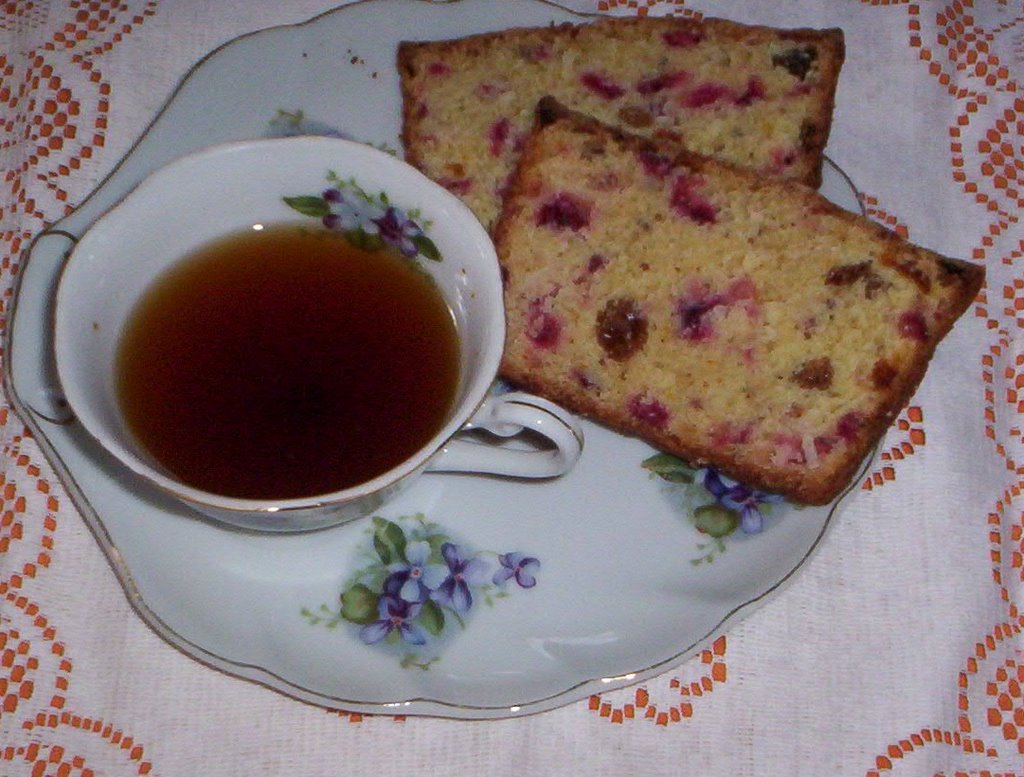
This is not your typical cranberry/orange loaf. The addition of ½ cup flaked coconut and ¼ cup golden raisins give real depth to a commonplace quickbread. I also think dried cherries would work well with this, possibly even a couple finely chopped pieces of crystalised ginger. I find that there is always a bit of coconut left over in recipes and it tends to get dried out in the back of the fridge until I stumble upon it one day. This is the prefect recipe for that slightly dry coconut that you just cannot bear to toss away.
You will need:
2 cups all purpose flour
1 cup granulated sugar
1 ½ teaspoons baking powder
½ teaspoon baking soda
1 teaspoon salt
¾ cup orange juice
2 tablespoons canola oil
1 tablespoon orange zest
1 egg, beaten
2 cups chopped cranberries (I used frozen and chopped then in the food processor)
½ cup flaked coconut
¼ cup golden raisins
Preheat oven to 350 degrees F. Grease a loaf pan (9x5). Mix dry ingredients. Add orange juice, zest and egg. Add cranberries, coconut and raisins. Tap pan to make certain air bubbles are out. Bake on centre rack of oven for 55-60 minutes or until it passes the toothpick test. Cool in pan 10 minutes, then on rack. Slice when cool.
Black Bread
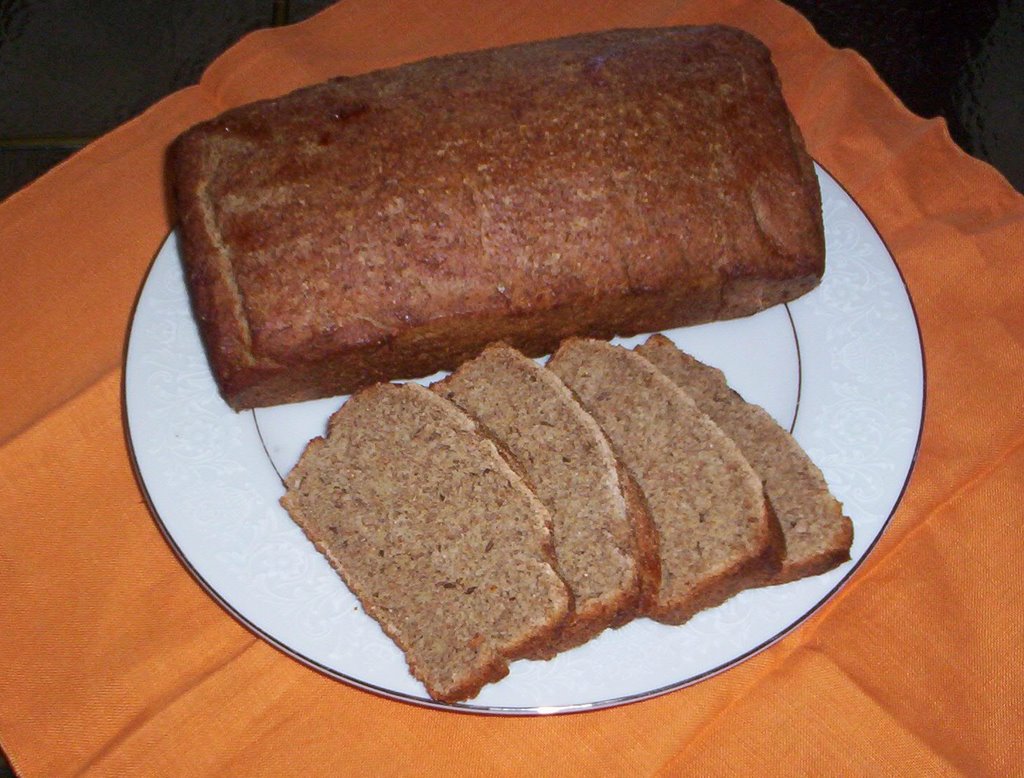
This is the recipe for black bread in Beard on Bread. I did not care for it as I found it too heavy and dense. My husband however, really enjoyed it claiming it is what he typically thinks of as “rye bread.” It was difficult to knead by hand, though I am admittedly, rather arthritic. If I were to make it again, I’d certainly use a few tablespoons of vital wheat gluten to lighten it up a bit. I froze one of the loaves and it will be interesting to see how well it defrosts.
You will need:
3/8 cup cornmeal
¾ cup cold water
¾ cup boiling water
1 tablespoon butter
1 tablespoon salt
2 tablespoons and 1 teaspoon brown sugar
1 ½ teaspoons caraway seeds
1 tablespoon unsweetened cocoa
1 tablespoon instant coffee
2 packages active dry yeast
¼ cup lukewarm water
2 cups rye flour
1 cup whole wheat flour
2 cups unbleached all purpose flour
additional flour for kneading
1 egg white mixed with 2 tablespoons cold water
Add cornmeal to the cold water and mix well. Pour into boiling water and stir until thickened. When thick and bubbly, stir in the butter, salt, seeds, cocoa and coffee.
Dissolve the yeast in the warm water and add to the mixture.
Blend in the flours adding liquid if needed until you have a sticky dough. Knead on a floured board until firm and elastic. Place in a well buttered bowl, turn to coat and cover. Let rise until doubled (about 2 hours).
Punch down, divide and roll into loaves. Place in 2 well greased loaf pans and again cover. Let rise until almost doubled.
Before baking, brush with egg wash. Place in pre-heated 375 degree F. oven for 50-60 minutes or until it sounds hollow when rapped.
Monday, October 16, 2006
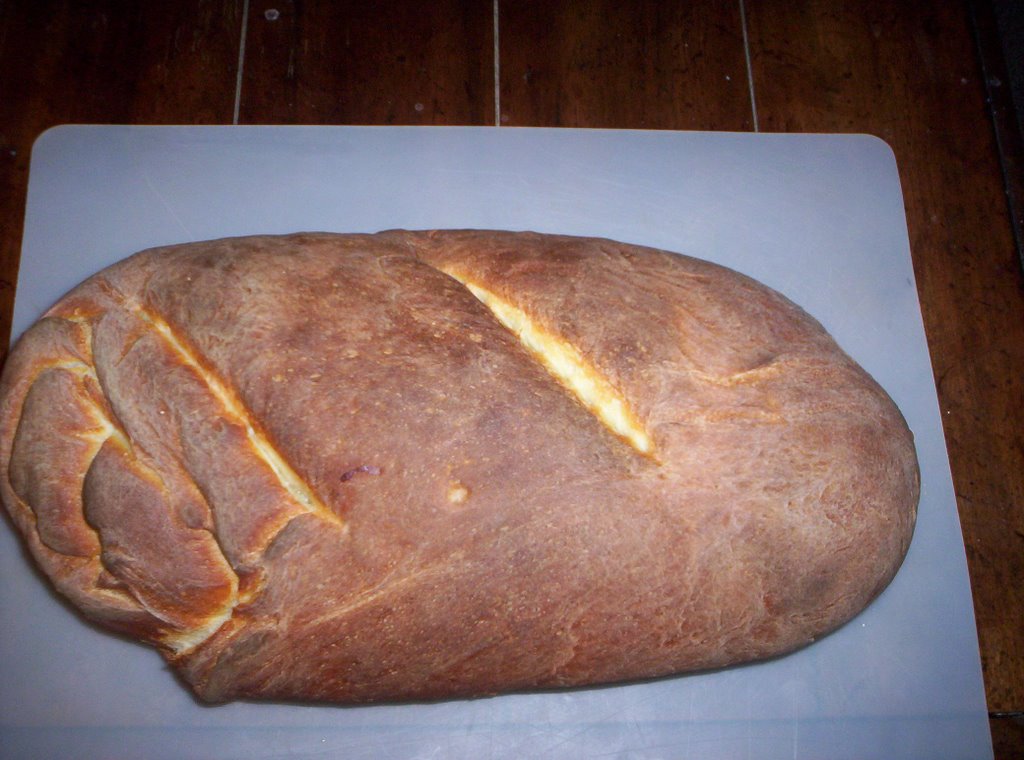
World Bread Baking Day
It figures, World Bread Baking Day and my stand mixer is broken! The gears made an awful noise one day last week, and then it stopped turning. I did knead a loaf of “continental style” bread by hand for tonight’s dinner but it is nothing spectacular. One rise-quick and easy.
Last evening I made biscuits to go with black bean soup. I suppose corn bread would have made more sense. I thought they were mediocre but I don’t honestly have much baseline for comparison. I’ve spent most of my life in Illinois and Massachusetts-not exactly biscuit towns. Ay least they weren’t hard. My son seemed to enjoy them as the size was simple enough for a 22 month old to manage.
I’m sort of hoping the mixer cannot be repaired so I have an excuse to start looking for a used Hobart countertop model (can’t afford $2,000. for a new one). I always swore if it came to purchasing a commercial mixer I’d better set up business, but then I swore the same about building a brick oven outside which I’m now giving serious consideration to.
So here’s what I did to make my “continental bread” (a VERY) modified version of James Beard’s recipe in Beard on Bread.
3 ¾ teaspoon granulated yeast
2 cups lukewarm water
1 tablespoon sugar
1 tablespoon salt
5-6 cups bread flour
Proof the yeast in water and sugar. Mix in as much flour (and the salt) as the liquid will take and knead about ten minutes until smooth and elastic. Place in buttered bowl, cover, and let rise until doubled (1-2 hours). Preheat oven to 450. Gently degas and shape into one large loaf. Score. Transfer to a baking sheet that has been tossed with cornmeal. Use whatever technique you prefer for getting steam into your oven (I pre-heat a pan and toss the water in that). Place bread in and after twenty minutes, turn and continue baking another 10+ minutes or until it passes the hollow test or registers an internal temperature of about 100 degrees F.
Happy International Bread Baking Day!
Wednesday, October 04, 2006
Cranberry Ice Cream

In advance of Canadian Thanksgiving, I thought I’d offer my recipe for cranberry ice cream ( Sigh, I was going to do cookies as I have a wonderful old maple leaf shaped cookie cutter that was a souvenir of a trip to St. John many years ago, but I’m afraid it must have been misplaced when we moved. Guess I’ll just have to go back and get another…)
You will need:
1 cup of prepared cranberry relish ( 1 package cranberries cooked in 1 cup sugar and 1 cup water, simmered for ten minutes and then permitted to cool at room temp).
½ cup heavy cream
½ cup whole milk
¾ cup granulated sugar
1 teaspoon vanilla extract
Mix everything together and process according to your ice cream maker’s instructions. My machine is sort of wimpy, so I stir in the majority of the cranberries afterward.
You can make this as ice-milk, which I frequently do. For extra tartness you can add a bit of orange zest (omit the vanilla).
Brandade de Morue-3 Ways to Serve
Clockwise:
On large croutons brushed with olive oil, mixed with mashed potatoes and used to stuff ravioli, and fried in a dough similar to what is used for samosas.
I still think a better use for salt cod is in chowder, but this was fun to experiment with. Unfortunately, I used a pound of salt cod and now have quite a bit of it as it reconstitutes to about double its size. Ooops.
The basic idea is to soak the cod for a couple days changing the water a few times each day. Then poach the cod, shred it, mix it with 1 cup warm milk and about a cup of warmed olive oil with a few garlic cloves (alternating until all oil is gone-you may not need all the milk). Adjust salt and pepper, maybe a bit of nutmeg. A stand mixer will help mash the fish better. And that's pretty much it. If you reheat it, don't microwave it (really, trust me on this) but use a double boiler or place a bowl in a strainer basket over boiling water. Once the fish was poached, the process went rather quickly.
I tried stretching my imagination for other uses, but couldn't come up with any. As it works fine for ravioli, I don't see any reason that it wouldn't work for pierogi. Let me know what you come up with if you try it.
Tuesday, October 03, 2006
Dutch Crunch/Tijerbrood ("Tiger Bread")
Not only was this quick (by yeast bread standards) with two short rises, but simple enough to put together. The recipe comes via Bakingsheet and may be found HERE.
One note:
In the recipe for the topping it was not mentioned how to put it together. An experienced baker would read the list of ingredients and know to proof the yeast in the warm water and sugar, adding the rest of the liquid items and then the flour-I think the novice might be confused. So, that’s how you do it.
I can see making this often, though I might make the rolls a bit smaller-recipe makes six.
Monday, October 02, 2006
Rugelach

These were so good I may eat the entire batch alone!
The recipe comes from Cooking With Memories by, Lora Brody. I made a few adjustments by omitting the nuts and using orange marmalade rather than apricot preserves. I'll post the original recipe and leave any customising to readers. I prepared a half-batch of this recipe today, and it worked well. The recipe below makes 4 dozen.
For the Dough:
2 sticks unsalted butter at room temperature
8 oz. cream cheese at room temperature
1/4 cup granulated sugar
1 teaspoon vanilla
2 cups flour, measured after sifting
-Cream the butter and cream cheese. Mix in the sugar and vanilla. Add the dough and work until a soft ball. Divide the dough into four even portioned balls and wrap in plastic. Chill for a few hours (I did just under two and it was fine).
For the Filling:
1 cup granulated sugar
1/2 cup brown sugar, packed
1 teaspoon cinnamon
1 1/2 cups golden raisins (I used red ones)
1 1/2 cups walnuts, coarsely chopped (I omitted these and added extra raisins)
-Combine and stir well.
To Assemble:
1 12 ounce (1 1/2 cups) jar apricot preserves, heated
1/4 cup milk
2 tablespoons sugar mixed with 1 teaspoon cinnamon
-Remove the dough from icebox, and let sit at room temperature for 15 minutes. Pre-heat the oven to 350 degrees F. with the rack in the centre position. Line three heavy duty baking sheets with parchment (or as the author suggests, butter and lightly flour them).
One at a time, roll out each ball of dough until you have a round that is 1/8 inch thick. Cut into 12 triangles, as for pie. With a thin knife, loosen the triangles and spoon on a small bit of preserves. Spread a generous amount of filling on each and then beginning at the wide end, roll up into a crescent. Place on baking sheet, 1 1/2 inches apart. Brush the rugalach with milk and sprinkle with the sugar/cinnamon mixture. Bake for 16-18 minutes or until lightly browned.
Cool on racks and try not to eat them all at once!
Sunday, October 01, 2006
Struan Bread

I really don’t understand why people are so fanatical about this bread. It’s pleasant, and has a nice texture and crunchy crust-but it’s certainly not the best bread I’ve tasted. I also don’t understand why it is considered “a lot of work” to make. Outside of two 90 minute rises, it really wasn’t any different than any other loaves of bread-save for some odd ingredients. I suppose if you always have wheat bran and buttermilk on hand then it wouldn’t be much trouble to toss this bread together without planning. I guess I’ll make it again as I now have a large box of wheat bran with no other use in mind (a blurb on the box suggests using it to stretch ground beef in meat loaf, but I think that sort of borders on heresy (like when my mother would “stretch” the salmon patties with a small tin of tuna).
The recipe may be found HERE.
Wednesday, September 27, 2006
Pumpkin Pie (and Grape Nut Ice Cream Recipe)

This pie is one of the simplest to make (even simpler if you use tinned pumpkin). I’ve tried making it with squash to great effect as well. The spices are of course, flexible. I happen to live with someone that prefers pumpkin as a savoury rather than a sweet so I cut the sugar dramatically and omit the cinnamon replacing it with ginger and occasionally, cloves. I’ve also made this pie seasoned with garlic powder, olive oil and carmelised onions to be served as a side-dish to meat. What I’m providing here is a basic recipe that is easily adapted.
For the Crust:
3 cups flour
1 teaspoon salt
1 ¼ cups shortening
1 egg, beaten
1/3 cup cold water
1 tablespoon white vinegar
Mix flour and salt. Cut in shortening. Combine water, egg and vinegar. Mix well into flour mixture. Let rest a bit before rolling out.
For the Pie:
1 ½ cups mashed pumpkin
1 egg
½ cup warmed milk
½ cup warmed cream
1 tablespoon flour (I use Wondra sauce flour for this as it dissolves quickly)
1 tablespoon molasses (Sorghum is a big agricultural product around here and you could certainly substitute it)
¾ cup sugar (you may prefer more)
1 teaspoon cinnamon (unless your crazy husband hates it)
1/8 teaspoon nutmeg
1 tablespoon browned butter
pinch of salt
Combine everything and pour into an unbaked pie crust (it helps to build the sides up pretty high for this pie). Cut out shapes from leftover pie crust.
Bake at 450 degrees F. for 15 minutes, then reduce the heat to 350 for 45 minutes.
I’m serving mine with
Spiced Grape Nuts Ice Cream:
1 cup milk
1 cup heavy cream
1 cup brown sugar
1 teaspoon vanilla extract
1 teaspoon cinnamon
1/8 teaspoon cloves
1/8 teaspoon ginger
1 cup Grape Nuts Cereal
Make a paste of the sugar and spices with a small bit of milk, then dissolve in the rest. Freeze according to your ice-cream maker directions. Before transferring to container, stir-in a cup of Grape-Nuts cereal.
Wednesday, September 20, 2006
Candy Apples
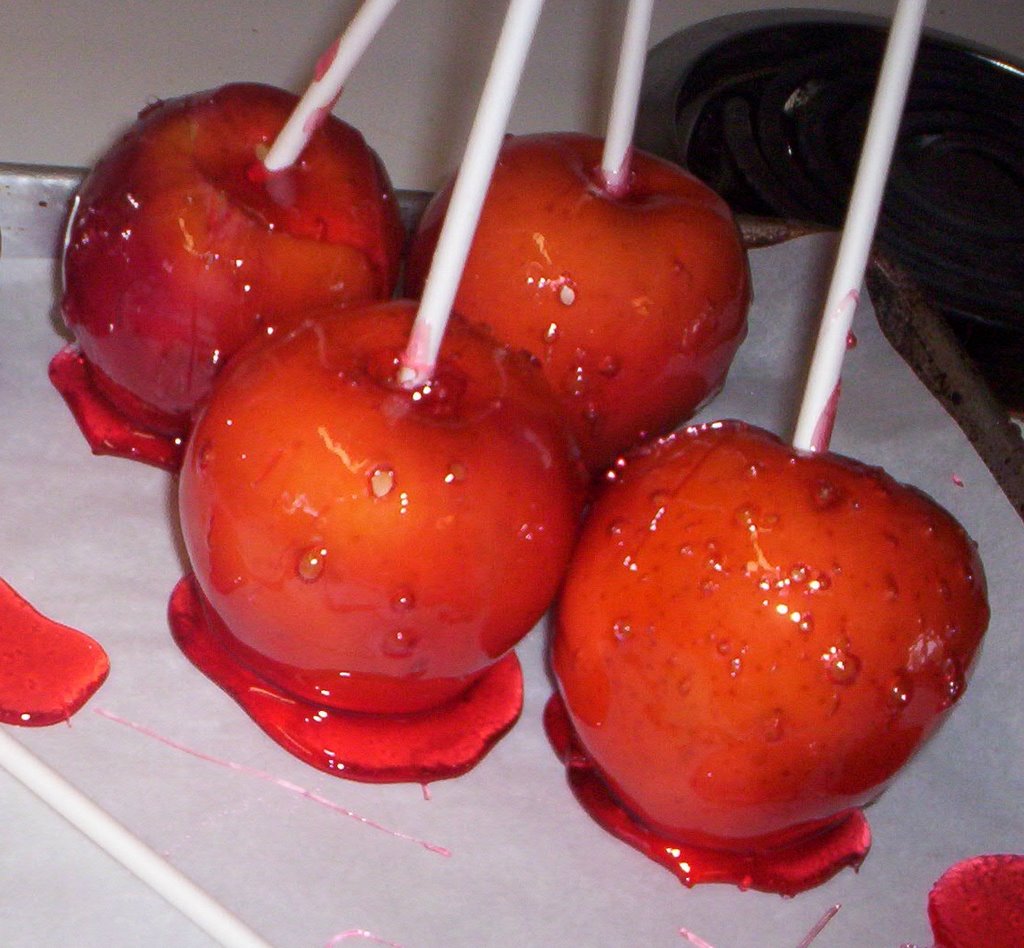
I finally achieved my lifelong goal of making candied apples. Since childhood, I’ve been fascinated by them, likely because it is the sort of thing that would not have been permitted in our home. My mother had her own “version” of candied apples that involved baking them in diet ginger ale and tossing two (and only two) cinnamon candies in the cored centre of each. Yeah, that really made a good substitution.
You Will Need:
12 med. Apples
sticks
a few drops of oil of clove
¾ cup corn syrup
1 cup water 3 cups sugar
red food colouring
Wash the apples in warm water and dry well. Poke a stick into each. In a heavy bottomed pot combine sugar, corn syrup and water and stir until dissolved. Add food colouring and cloves and let cook over medium heat without stirring until it reaches 290 degrees F. on a candy thermometer(hard crack stage). Set pan over boiling water (I set the small pot in a strainer over the large pot) and quickly coat the apples. Set to dry on parchment paper. This was my first attempt and as you can see in the photograph, they are a bit sloppy-luckily, there is still plenty of time before Halloween to practise
I set my ceiling fan on high to waft the smell of cloves through the house and when Danny woke from his nap he followed the scent right to the kitchen where he stood looking up at the rosy coloured shiny apples on the counter. Excited would be an understatement.
French Bread (Sort Of)

This French Bread was a challenge to shape-like trying to make a baguette from batter. I improvised the dough starting with a pre-ferment of 1/8 teaspoon instant yeast, ½ tablespoon salt and about 4 cups of bread flour. I added water until it was just moist, but still slightly dry.
In the morning I added about another three and a half cups of flour and let it rise nearly three hours. Folded it, let it rise another hour. Divided, let it rest 10 minutes and then (ha ha) tried to “shape” it. I used extra steam in the oven today which seemed to help develop the crust. Anyway, certainly not the best I’ve done, but respectable.
I always forget to measure Danny’s height against the yardstick in the photo-perhaps I should just start documenting baguettes.
*Update-I served it for dinner this evening and consensus is that the baguette was my best bread yet. The crust really was crunchy without being “toasted” (over baked) and the interior crumb was quite open and airy.
Tuesday, September 19, 2006
Chocolate Covered Caramels
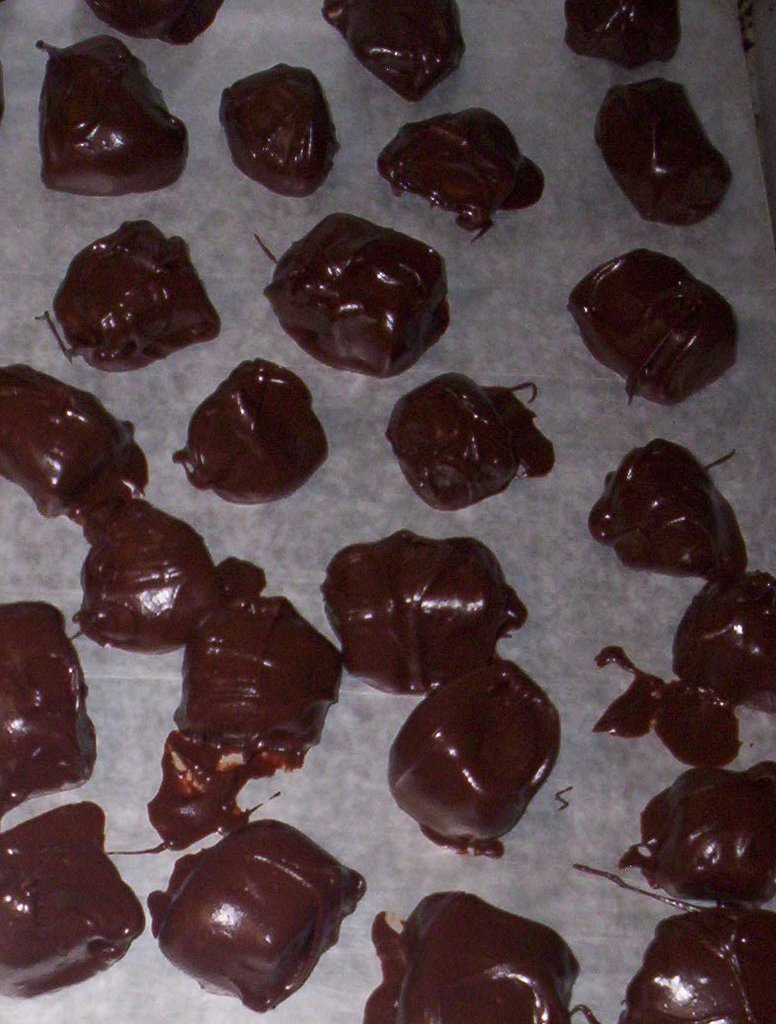
Nothing like the first really cool autumn day to make a person think of chocolate covered caramels-well, me anyway. The recipe is simple, though it requires quite a bit of time standing at the stove. I waited until my toddler was off for a nap to do the cooking part. While the caramels cooled, I pre-cut squares of waxed paper for wrapping them.
I coated the candy with what I had on hand, which today was three packages of semi-sweet chips that I bought super-clearanced at the grocer one day figuring “I’ll use them eventually.” You could of course, use better quality chocolate.
You Will Need:
2 cups sugar
1 cup brown sugar
1 cup light corn syrup
1 cup heavy cream
1 cup milk
1 cup butter
1 ¼ teaspoon vanilla extract
In a heavy pot, (I use an enamel coated cast-iron one to retain heat) combine everything except the vanilla and cook over medium heat until it reaches 248 degrees F. on a candy thermometer, stirring occasionally, taking care to scrape the sides (a heat resistant spatula is helpful).
Pour into a well-buttered 8x8x2 pan. Cool. When firm, loosen the sides with a butter knife and place on cutting board. Using a sharp knife (that you’ll need to frequently run under a hot tap to keep clean) cut into squares and place on baking sheets pre-lined with waxed paper. At this point you can coat them with chocolate or leave them plain. When dry, wrap in squares of waxed paper. I cut mine generously and still had six dozen.
Monday, September 18, 2006
Two Varieties of Graham Crackers
 First off-both taste great. I'd be happy to snack on either or make a really amazing pie crust from them.
The darker coloured grahams contain molasses and use whole wheat flour. The lighter ones use specialty graham flour and are made crisp and light with the addition of an egg. It's a mater of style. The molasses/whole wheat crackers were harder and heavier-the others had a melt-in-the-mouth quality of a thin butter cookie.
The Lighter Graham cracker recipe came from The Prepared Pantry, and may be found(with helpful photograph and details) HERE.
The molasses version came from Bakingsheet, and may be found HERE.
The molasses crackers were prepared in my food processor which worked much better than I expected. Rolling the dough out and then chilling it also made for more uniform and easy to handle slices. Of course, they are homemade, and that look out to be reflected in the varied sizes and not-so-perfect piercing of holes.
I needed about two minutes more on both recipes in my oven, which runs pretty true to temperature.
Sunday, September 17, 2006
New Projects
This week, I'm experimenting with crackers and seasonal candied treats.
I found a wonderful old recipe for candided apples that called for oil of clove. As soon as I saw the ingredients, I remembered my mother used to keep a small vial of it in our medicine cabinet for toothaches-but that was many years ago.
I went to pharmacy #1, where a nostalgic, somewhat sad pharmacist told me they no longer carried it as there isn't any demand for it. He suddenly remembered that people used to flavour toothpicks with it. (I remember cinnamon toothpicks, but not clove).
Pharmacy # 2-the pharmacist tells me that he can order it, or I can purchase a very large ($8.00!) bottle of it in the organic foods section. I asked if he would order a small vial as I only require a few drops and he was happy to do it. By the time I reached the check-out, he had located a bottle for me and looked about the store to find me. That was really a very nice thing to do, on a weekend, at a busy supermarket pharmacy. I think I'm going to need to bring him some candied apples.
I'm not sure what else I can do with it. I've never tried making hard candies, but I think that clove flavoured lozenges would be pleasant.
I'm also going to make a batch of caramel apples from a 1930's recipe.
Do you have any idea how difficult it is to find pointed sticks for candied apples? Well, quite difficult. Tomorrow I'm off to try another craft store before I give-in and bunch together a number of bamboo skewers. If you purchase a bag of caramels, they give you a couple dozen in the bag-but who wants to eat mediocre caramels? I'll tell you who-"Mr. Nobody."
I'm also on a cracker kick. I have graham cracker dough chilling overnight and I'll bake them tomorrow. I also have a saltine recipe that involves a very long initial rise (30 hours) and then quite a bit of rolling and folding (think puff pastry). It seems that with a youngster in the house, we go through an awful lot of crackers and I'm sure I can make a better quality snack for less money. We'll see-the soda crackers might be an exercise in futility.
What I'm looking for (if anyone can help) are recipes for Vermont Common Crackers, and something resembling Jacob's Cream Crackers-neither of which are readily available where I live. If I could manage a decent approximation, I'd be happy.
I made two large pizzas for dinner tonight and had an interesting dough to work with. Early this morning, I mixed 5 cups of bread flour with 1 teaspoon instant yeast, 1 tablespoon salt, and enough water to make the dough pliable (slightly over a cup). I worked it for about ten minutes in the mixer and then divided the dough in half, placed them in oiled bags and set them in the icebox until I came home around five. I removed the, let them warm-up for about an hour and forty-five minutes (while I carmelised onion and did other prep work). I made "white pizzas" (without tomato sauce) that I baked at 525 for about seven minutes on the lowest shelf of the oven. They turned out very good-thin, but with some tooth. I've always added oil and sugar to my pizza doughs, but this seemed to be every bit as good.
I'm off to bed-I have a full day of baking ahead tomorrow. Results and film at eleven.
Friday, September 15, 2006
Chocolate Cake Roll

Once again, I've turned to Good and Pellman's Amish and Mennonite kitchens for inspiration( if you don't already own this cook book-get it. Not only is it lovely looking, so far every recipe I've tried (and that's much of the book) has been successful.
This is my first attempt at a cake roll and it came up well. I can envision using the basic cake recipe to cut into multiple layers for an elaborate cake without all the fuss of making a spongecake.
You Will Need:
(for the cake)
3 eggs, separated
1 cup sugar
1/3 cup water
1 cup flour
1 teaspoon baking powder
confectioners sugar
(For the filling)
2 tablespoons cocoa
2 tablespoons cornstarch
3/4 cup sugar
1 cup cold water
1 tablespoon butter or margarine
1/2 teaspoon vanilla
Preheat oven to 425 F.
Grease and flour a jelly roll pan
Beat three egg yolks, 1 cup sugar and water together until light. Slowly beat in flour and baking powder.
Beat three egg whites until stiff. Fold flour and egg mixture in carefully.
Pour into prepared pan. Bake at 425 for 8 minutes.
Loosen sides with a knife and invert on a cotton towel that has been dusted with powdered sugar. While cake is hot, roll-up in the towel for a few minutes, then unroll.
While cake is cooling, prepare filling.
Stir cocoa, cornstarch, sugar and water into a saucepan and heat until mixture comes to a boil. Remove from heat. Stir in butter and vanilla. Cool. Spread on cake. Roll and dust top with additional confectioners sugar.
Tuesday, September 12, 2006
 Once a year, at Rosh Hashanah, I make a number of honey cakes to send to Jewish friends for the new year. This year I also made small round challas with raisins to send along as well. I failed to take photographs of them before wrapping them for the post, so instead, I posted a photo of my son shopping for the ingredients. The base recipe comes from Cooking With Memories, by Laura Brody, though I have altered the recipe over the fifteen years that I’ve relied on her book. Because so many people are allergic to nuts (myself included) I omit the almonds in the original recipe. I also omit the cognac as it is something we almost never have on hand and hardly seems worth investing in just to make a few cakes once a year. I don’t think the recipe suffers for it. I’ve increased the amount of raisins to 1 cup and I use both goldens and flame. Some years, I substitute crystalised ginger. The recipe is flexible and forgiving and pretty much save for burning it or under baking, it can handle what you do with it. My husband likes slices of it warmed in the microwave and then spread with cream cheese and a bit of additional honey. I’ve been known to toast slices and spread it with marmalade or blackcurrant jam.
For shipping/freezing, I wrap them tightly in wax paper, and then again in plastic wrap. This seems to work well and it is a method I use for soft breads as well. The apples keep the cake moist and it should hold up well for at least a week, though I advise keeping it refrigerated once it has been cut. A few seconds in the microwave or toaster also revives the ends gone stale.
You Will Need:
3 ½ cups flour measured after sifting
1 teaspoon baking soda
3 teaspoons baking powder
1 teaspoon cinnamon
½ teaspoon nutmeg
¼ teaspoon ginger
½ teaspoon cloves
1 cup honey
1 cup strong coffee (instant ok)
3 tablespoons cognac
1 teaspoon vanilla (I use 2)
4 extra large eggs
½ cup vegetable oil
1 cup dark brown sugar, packed
2 apples, peeled, cored and finely chopped (I do this ahead and sprinkle with lemon juice to keep colour)
½ cup golden raisins
½ cup flame raisins
½ cup almonds for topping
Preheat the oven to 350 degrees F. with the rack in the centre position. (325 if using glass pans). Grease either 2 9x5 inch loaf pans, or one large 12x15 baking dish. Sift the flour, baking soda, baking powder, and spices together in a bowl and set aside.
In a saucepan, boil the honey and coffee. Cool slightly and add vanilla and cognac. In the bowl of an electric mixer, combine the eggs, oil, apples, and sugar. Mix well. Add the flour in three additions alternating with the coffee mixture. Mix in the raisins. Pour into well greased pans and sprinkle the tops with almonds if desired. Bake 1 hour or until toothpick comes out clean. Cool in pan ten minutes then cool on rack.
Caramel Popcorn

This is so easy, you’ll never buy that horrible, cloying, sprayed-on caramel corn at the supermarket again. The recipe comes from, Amish and Mennonite Kitchens, by Phyllis Pellman Good and Rachel Thomas Pellman. It is, by the way, a wonderful cookbook. I was well into my thirties by the time I learned to make a pie crust from scratch and it is their recipe I rely on.
You will need:
3 ¾ quarts popped popcorn (I popped mine in oil the old fashioned way on the stove)
1 cup brown sugar
½ cup margarine (I used butter)
¼ cup light corn syrup
½ teaspoon salt
½ teaspoon baking soda
½ teaspoon vanilla
Preheat oven to 200 degrees F.
Pour popcorn into a large roasting pan. Mix sugar, margarine, corn syrup and salt in a saucepan and cook gently over medium heat until it comes to a boil, stirring constantly. Then boil for five more minutes. Remove syrup from heat and stir in vanilla and baking soda, stirring until it becomes foamy. Pour over popcorn and stir to coat (note, it will not “coat” in the sense of covering every inch of popcorn the way commercial caramel corn is-not to worry though, it is plenty sweet and makes for a nicer texture). Bake for 1 hour, stirring every fifteen minutes. Cool,(if you can get your family to wait that long) and crumble into small pieces.
I stored mine in paper bags which my husband polished off during his commute to work this morning.
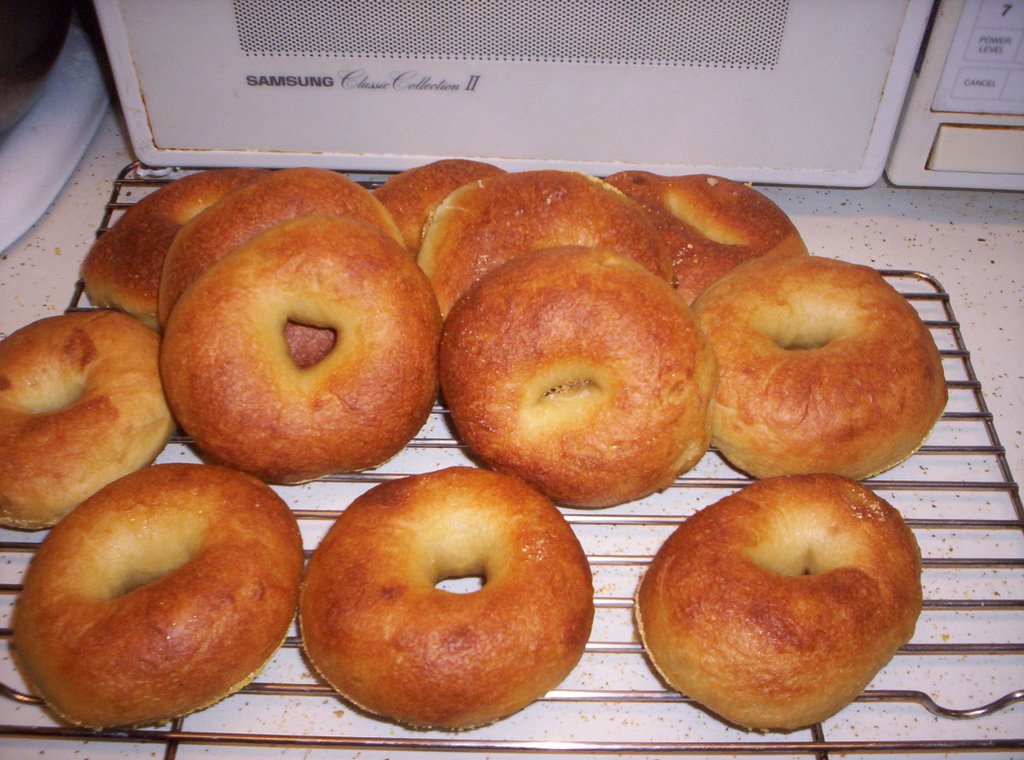
Bagels Boiled and Baked
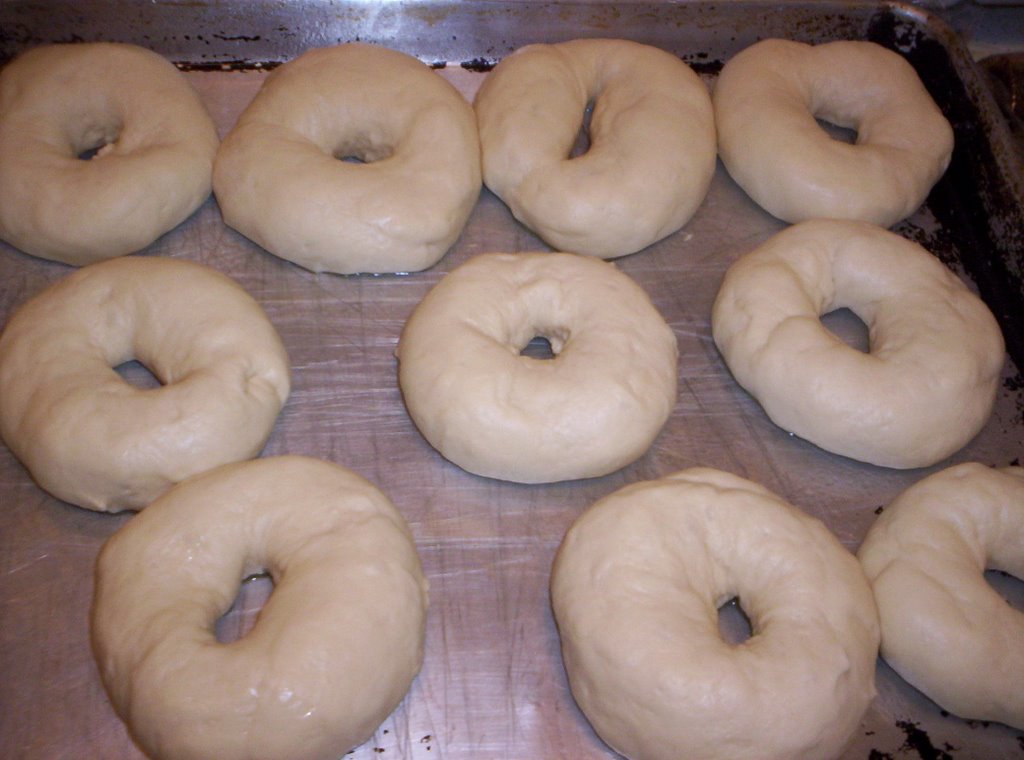
For this recipe, I am again indebted to Floyd at The Fresh Loaf. The recipe can be found HERE. I made a few adjustments and have some observations to share.
I tried the recipe twice, once using regular Gold Medal bread flour, and again using their new Harvest King Flour. I was unable to discern any difference. My husband thinks the Harvest King yielded a slightly denser bagel, though he admits that the difference is so minimal it is hardly worth noting. I’ve tried other bread flours, (though I can’t swear by the unlabeled “bread flour” they sell at Ideal Grocery in Lincoln, NE as they package it in a clear plastic bag. For all I know, it may well have been Gold Medal. I’ve used Pillsbury, and Hodgson Mill-all acceptable flours, but in our area, the Gold Medal is the most economical for the quality. I’ve wanted to try the King Arthur flour but it is just prohibitively expensive for my budget.
Even with a Kitchen Aid Professional 350 watt stand mixer, I had a difficult time getting all the flour called for incorporated into the dough. By the time I had to hit the reset button three times (we call it the “core meltdown button”) I knew I had maxed the amount of flour it would take. It might have been the humidity in the room that particular day, or some small variation in the flour-but those things are to be expected with bread baking. I worked the dough until it was stiff and let it go a cup short of the total, and it was fine. It does make me think of moving up to a commercial mixer though (our circuits can handle it) which if I stop to think about it is sort of terrifying that I’m doing enough baking to justify the investment in a commercial mixer.
I was unable to locate malt syrup so I used honey instead. That did tend to sweeten the dough slightly and I noticed that the bagels did better the second time with more salt, though that may be a personal preference.
I made mine smaller (still quite large by anyone's standards) and yeilded 18.
They held up well, and provided a couple hours of teething entertainment for my toddler son. My husband, who is used to East Coast bagels, and is not the sort of person inclined to flattery, claims they are the best bagels he’s ever eaten. Certainly better than anything available around here.
Friday, August 18, 2006
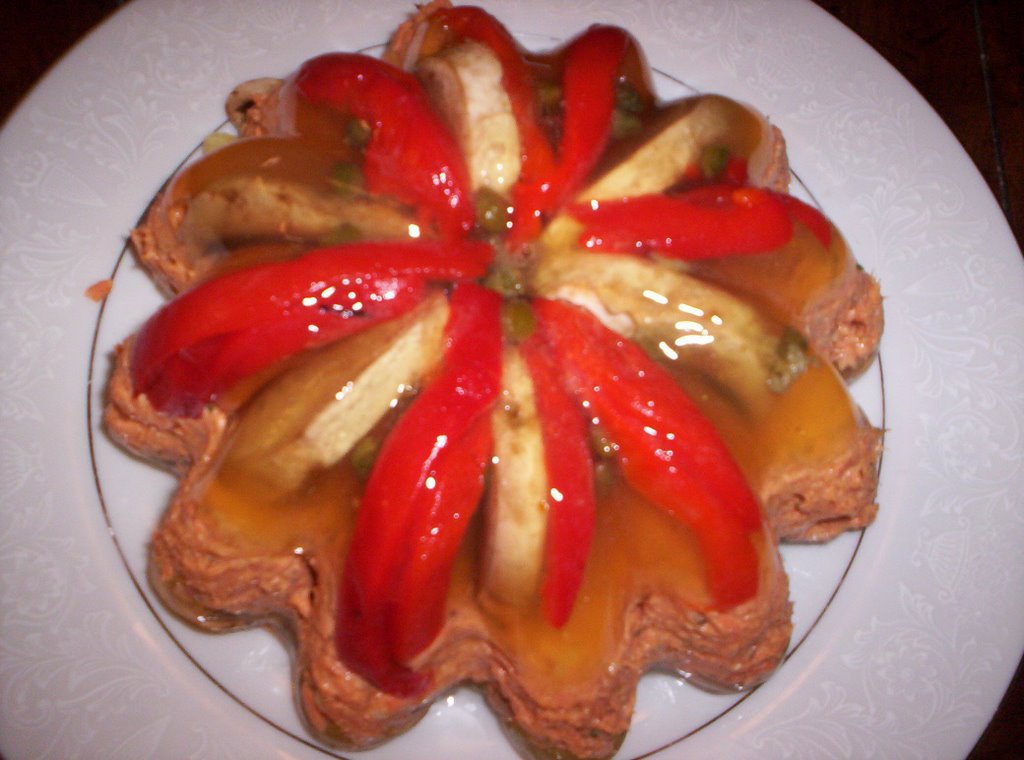
"Quilted" Corn Bread
One of the simplest ways to dress up a cornbread is with roasted red pepper and flat parsley. The red pepper is a nice compliment to the taste of cornbread. 

Curried Salmon in Aspic
It was lovely, molded with mushrooms, capers and roasted red pepper. To be polite, my husband took a couple of bites, discreetly pushing the aspic aside on the plate.
I'm glad I took a photograph, as I likely won't be preparing this again.
Baked Tomatoes
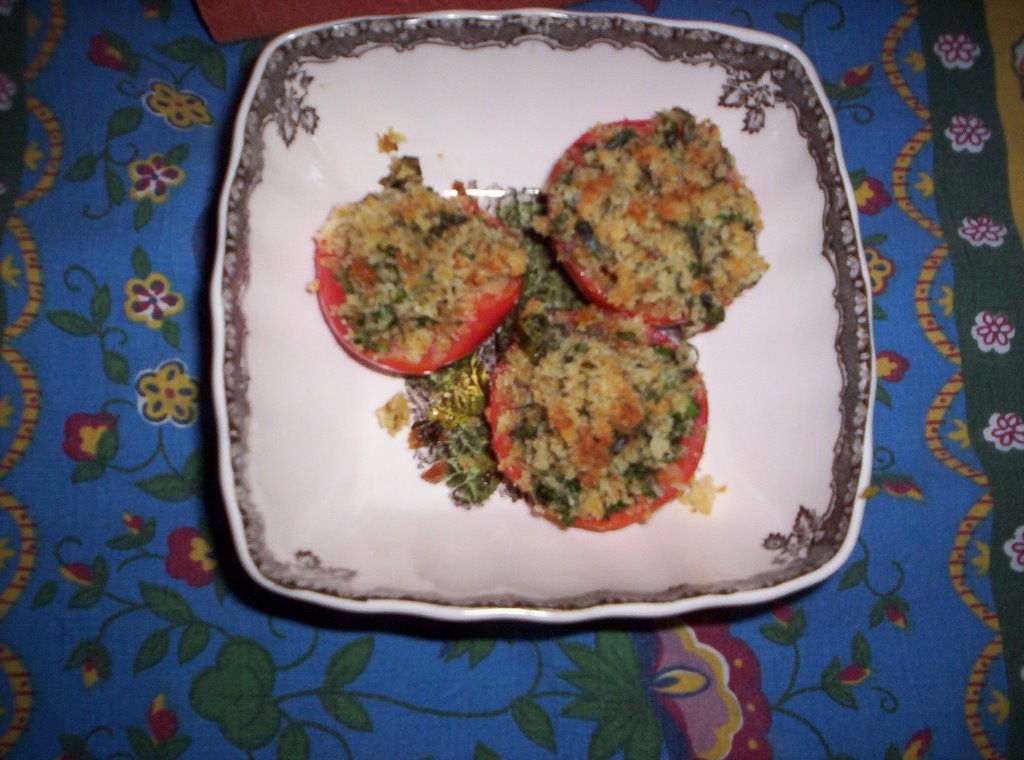
The filling for these small tomatoes was quite simple:
Fresh white breadcrumbs
Olive oil
Fresh Basil, oregano, and Rosemary
Salt
Garlic powder
I baked them at 400 degrees F. until the tomatoes were soft (about ten minutes).
Sunday, August 06, 2006
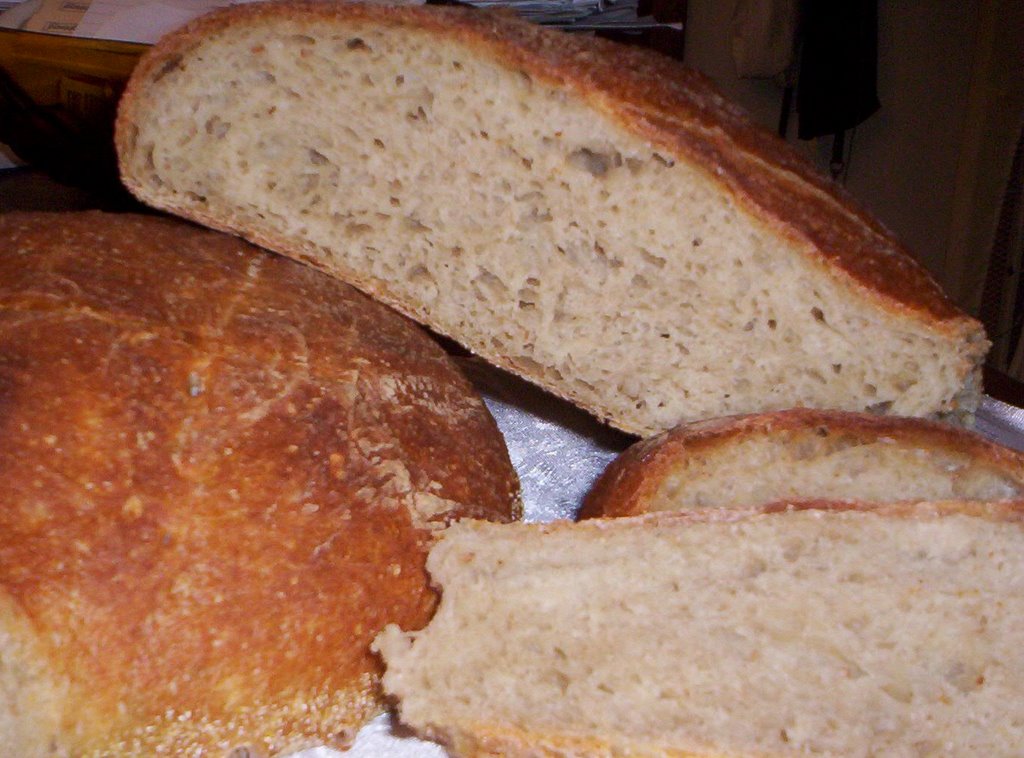
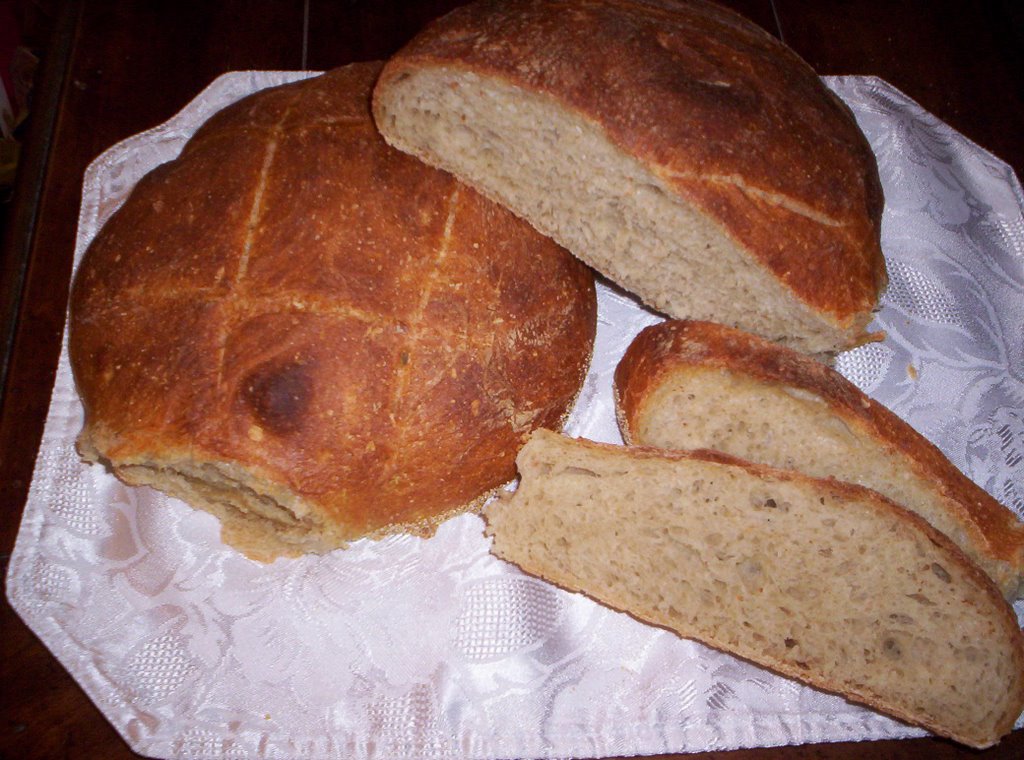
Rustic Bead II
This recipe for wheaten rustic bread came from Floyd at The Fresh Loaf.
A few observations about this bread:
I wouldn't try this as your first attempt at bread baking. The dough is quite wet, sticky and difficult to handle. After a while, you'll have picked up a few handling techniques that can't really be translated into directions, but by "feel" you'll sort of know what to do. A year ago, I could not have managed this loaf.
I baked this on a hot day with high humidity and I should have used a bit more flour to compensate.
I opted for a heavy, commercial jelly roll baking sheet lightly tossed with cornmeal, rather than a stone-the results were good though I did not get as much spring as I might have hoped for.
Two cups of water thrown into a pan that pre-heated along with the oven did the trick for steam-the crust was perfect.
Using an exacto knife for scoring does not work as well as one might think.
I'll attempt it again later this week and post results.
Saturday, August 05, 2006
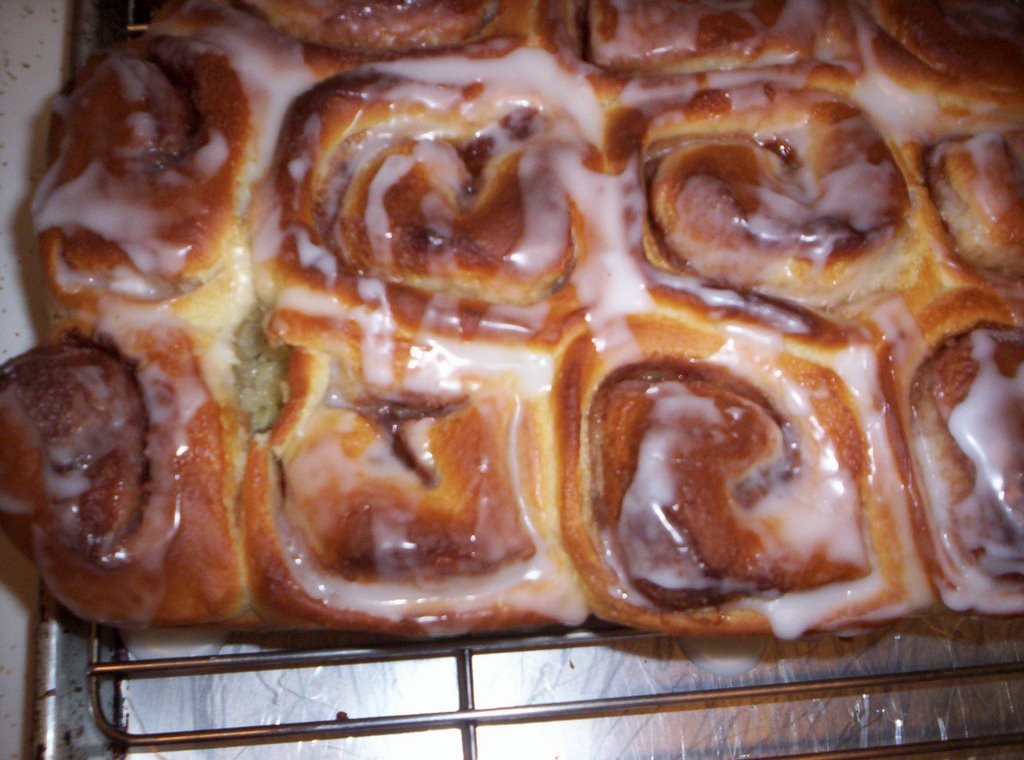
Cinnamon Rolls
 I made these last Sunday, and my husband is already requesting a repeat for this week. The recipe comes from my 1950 edition of the Betty Crocker Cookbook(aka-"the red cookbook"-though truth be told, most of the recipes sound pretty bourgeois...)
I made a few changes that will better reflect the way we cook today (adjusting for granulated yeast, and so on). Most of the ingredients can be mixed the night before and set in the icebox to begin the next morning. If you pre-mix the dough, be sure to allow extra time for it to warm up once you bring it out in the morning.
Sweet Rolls:
1/2 cup milk at room temperature
1/2 cup sugar
1 teaspoon salt
4 1/2 teaspoons granulated yeast
1/2 cup lukewarm water
2 eggs
1/2 cup shortening
4 1/2 -5 cups or more sifted all purpose flour
Proof the yeast in the warm water and set aside. Mix together the milk, sugar and salt. Add the yeast. Add shortening and eggs and the flour in two additions. Knead until smooth but still somewhat sticky-you don't want to add so much flour that it dries out. Place dough in a buttered bowl, turn once to coat and cover tightly with plastic wrap and a towel. Let rise in a warm, draft-free place about 1 1/2-2 hours.
When doubled in bulk, punch down and let rise again until almost doubled (about 35-45 minutes).
Cinnamon mixture:
1/2 cup sugar
2 teaspoons cinnamon
2 tablespoons softened butter
Roll out dough into a large rectangle. Spread with butter and top with sugar/cinnamon mixture. Roll up tightly from wide end and pinch seam closed well. Cut roll into 1 inch slices and place in a well buttered 13x9 pan. Cover and let rise until doubled (35-40 minutes). Bake in pre-heated 375 degree F. oven until baked through (the cookbook advises testing with a fork, but I needed to pull it from the oven and give it a push with a finger). Makes about 18 rolls.
Glaze:
The recipe did not offer one but a simple trick is to take 1 cup of powdered sugar and a teaspoon of water adding more or less slowly until thick. Spread over still warmed rolls. You could of course make the glaze with milk or cream as well.
Tofu With Green Beans
 This recipe can be adapted to make use of whatever vegetables you happen to have on hand. Broccoli, carrots, onions, bamboo shoots-all work well.
For the marinade:
6 tablespoons sesame oil
4 tablespoons hoisan sauce
2 heaping tablespoons black bean/garlic paste
1 tablespoon dried minced garlic
canola oil
Combine everything except the canola oil in a measuring cup. Add enough canola to total 1 cup all together. Place desired vegetables in a large bowl or plastic zip seal bag and add the marinade. Let sit a few hours or overnight.
For the Tofu:
extra firm tofu-drained, patted dry, and cut into strips
canola oil for frying
Fill frying pan with enough oil so that tofu will be covered. Heat to just past medium on stove setting (taking care not to let oil smoke) and drop the slices in. Fry, turning occasionally until edges become golden. DO NOT OVERCOOK! Remove and drain. When cool, store in icebox until ready to use.
To prepare:
Cook the marinated vegetables in a deep frying pan over med/high heat until soft. Add tofu towards the end-just to heat through. Serve over rice. It should serve about four people, though it can be stretched by cutting the tofu smaller and adding additional veggies. I did not give exact amounts as it will vary. A lb. of green beans, or eight large carrots would be typical ratios to balance a block of tofu.
Samosas

These samosas are shaped like pierogi to make for easier frying.
For the filling: (can be made ahead)
3 cups (aprox) mashed potatoes
1/2 cup cooked peas
curry powder to taste
2 teaspoons dried onion flakes
salt to taste
olive oil if desired
For the pastry:
2 cups sifted all purpose flour
1 teaspoon salt
1/4 cup butter-melted
7 tablespoons yogurt (more if needed)
Sift flour and salt. Add butter and yogurt gradually working with your hands until smooth. Roll out thin and cut into circles. Fill and pinch closed with a fork.
Fry in hot fat (aprox 360 degrees on a fat thermometer) until browned. I prefer to drain on a cooling rack placed over a baking sheet to prevent them sitting on soggy paper towels.

Chocolate Glaze For Gateau
This glaze is very difficult to handle and thick. The effect is gorgeous-shiny as glass, but you need to work quickly with good utensils. I rather think a heat resistant spatula is required for this, as is a heavy cast iron/enamel pan for cooking. You don't want the mixture to scorch.
Have the gateau assembled ahead of time on a piece of waxed paper atop a baking sheet. The glaze is messy and after it hardens, you can scrape away the excess and transfer it to a plate without too much difficulty.
Have any decorations also ready to go. I cut pieces of crystalised ginger into flower petals, though if I had planned ahead, I might have made candied lemon peel for a decorative effect. You'll want to brush off as much sugar as possible so it does not spoil the shiny glaze. Place them quickly atop the gateau once the glaze has poured and press in gently.
I'd also caution against overcooking the glaze, or you will very likely end up with fudge.
Chocolate Glaze:
1 cup unsweetened cocoa (I like Droste) well sifted to remove lumps
pinch of salt
2/3 cup heavy cream
1/3 cup unsalted butter
1 1/3 cup sugar
1 teaspoon vanilla extract
Add everything except vanilla in pan over medium heat. Whisk constantly until smooth and begins to thicken (don't overdo it). Remove from heat and cool slightly before adding vanilla. Pour over gateau spreading quickly down sides. I try to let the top stay as untouched as possible to retain the glasslike appearance. Let set at room temperature and then transfer to plate and chill in icebox.
Lemon Filling For Gateau
Certainly, one could use orange to great effect with a dark chocolate glaze, but I had lemons on hand, so that was what I made.
Lemon Filling:
1 cup sugar
4 tablespoons cornstarch
1/2 teaspoon salt
1 cup water
2 tablespoons+ (depending on desired tartness) lemon zest (concentrated culinary oils work quite well here-a few drops go a long way)
1/2 cup lemon juice (strained to remove seeds)
2 tablespoons unsalted butter
Heat in a pan over medium heat whisking constantly. Bring to a boil and then go an additional minute. Chill before spreading. It will seem a bit gelatinous when it is removed from the icebox, but a few stirs will smooth things out. Don't freak out if you discover a bowl of yellow blob-that's how it is intended to appear. The colder it is, the better it will hold up to being coated under the hot chocolate glaze in the final step.
Genoise for Gateau
I varied Raymond Oliver's recipe to use less eggs as I really think seven eggs is a bit of overkill. I also used all purpose flour that I sifted twice, rather than cake flour. The recipe still came up quite light and flavourful.
A couple thoughts;
If you are fortunate enough to know someone (as we do) that can provide you with fresh eggs from their farm, depending on how the chickens are fed the colour of the yolks may intensely tint your finished product.
You really need a stand mixer to do this genoise properly. I can't imagine having the upper body strength to whisk enough air into the eggs by hand-though certainly before electrical appliances, people did. Personally, I wouldn't waste the eggs trying.
A double boiler would be helpful for warming up the eggs and sugar before whipping. I don't happen to own one so I set a large pot with a couple of inches of water on the stove. Across it, I laid a strainer with a handle, and I set the bowl with the eggs and sugar inside. Take care not to let the water touch the bowl (you shouldn't need more than an inch or two). Do not let the water boil, keep it on low heat and be patient. Give the mixture occasional stirs just to be certain the eggs don't begin to cook on the bottom. You only wantthe eggs lukewarm-so test frequently.
Make the clarified butter ahead-a good thing to have on hand anyhow.
Basic Genoise:
6 large eggs
1 cup granulated sugar
1 cup all purpose flour, sifted twice
1/2 cup butter, melted and clarified
1 teaspoon vanilla extract
Grease and flour two 9 inch cake pans. Preheat oven to 350 degrees F.
In a large bowl, combine the eggs and sugar mixing, but not beating. Set the bowl over water as described above and heat to lukewarm. The eggs should look thick and bright yellow.
Place the eggs in an electric mixer and whip them at high speed until they are fluffy and have at least doubled in bulk-if you sense they will go higher without collapsing-go for it.
Add the flour a small bit at a time and fold thoroughly, but very gently alternating with the clarified butter. Add the vanilla.
Bake in the centre rack for 25-30 minutes. Don't stick a toothpick in it to test for doneness! Press it lightly to see if it springs back. The cake should start to pull away from the sides as well. Remove from pan right away and cool on rack. Do not try to trim any over-flowed edges whilst hot. Wait until cool and it will cut much easier.
Friday, August 04, 2006
Rustic Bread and Chocolate Lemon Gateau

I couldn't wait to post these beautiful photographs-the recipes will follow later this weekend. I was surprised just how simple the genoise was to prepare, though I had the benefit of a stand mixer. The lemon filling and glaze were quite another matter. I hate to keep harping on it, but a good whisk is one of the best investments you can make for kitchen supplies. Oh, and heat proof spatulas-what a great innovation those are!
The bread was light and chewy, though I think my next attempt will make use of a preferment. I plan to try it again tomorrow, so it will be interesting to see if I notice a difference while I still have the old loaf around for comparison. I was able to get a fair amount of steam into the oven, but I suspect a baking stone would have enhanced the crust even more.
Wednesday, August 02, 2006
Pineapple Cookies

Prepare dough ahead of time to chill well.
For the dough:
1/2 cup shortening
1 cup sugar 2 eggs
2 tablespoons heavy cream
1 teaspoon vanilla
2 1/2 cups sifted all purpose flour
1/4 teaspoon baking soda
1/2 teaspoon salt
Mix together shortening, sugar and eggs. Stir in cream and vanilla. Sift dry items together and add to previous. Chill dough well for at least four hours.
Roll thin to 1/16" and cut into 3 inch rounds. Add filling and top with another round. Press shut with fork. With a sharp knife, cut out a small hole in the centre. Bake at 400 on greased cookie sheet about 8-10 minutes or until lightly browned.
Pineapple Filling:
1 cup sugar
4 tablespoons flour (or quick mixing flour like Wondra)
1 1/2 cups crushed pineapple, drained
4 tablespoons lemon juice
3 tablespoons butter
1/4 teaspoon nutmeg
3/4 cup pineapple juice
Mix sugar and flour together in a heavy pan. Add the rest. Cook over medium heat stirring constantly until thickened (five to ten minutes). Cool well before using to fill cookies.
Friday, June 23, 2006
Cherry Pie

I had fun making this pie. It was my first attempt at a lattice crust and I stood there in disbelief that it actually worked! Follow the standard crust recipe I have on earlier pie recipes, or use your own.
You'll Need:
-Enough crust for bottom and lattice top
-2/3 cup sugar
-2 tablespoons cornstarch
-1/2 cup water
-4-5 cups pitted dark, sweet cherries
-1 teaspoon vanilla (or almond extract)
-2 tablespoons butter
milk and sugar for glazing
Mix sugar and cornstarch in a large pot. Add water and stir over medium heat. Add the fruit and cook until thickened. Remove from heat and stir in vanilla. Pour into unbaked crust. Top with lattice that has been pre-assembled on a piece of wax paper (simply flip it over onto the pie). Brush with milk and sprinkle with sugar. Bake at 400 degrees until browned checking at twenty minutes and every five thereafter. If top gets too brown, cover with foil. Cool slowly and then store in icebox once cut.
Saturday, May 27, 2006
Beef Tamales in Pictures

The recipe follows photographs and uses standard masa recipe at bottom of vegetarian tamale recipe at bottom of page. I know there is likely a better format than a blog for keeping this all together-I just don't know what yet. Email me through my profile if you're confused about anything or have questions.

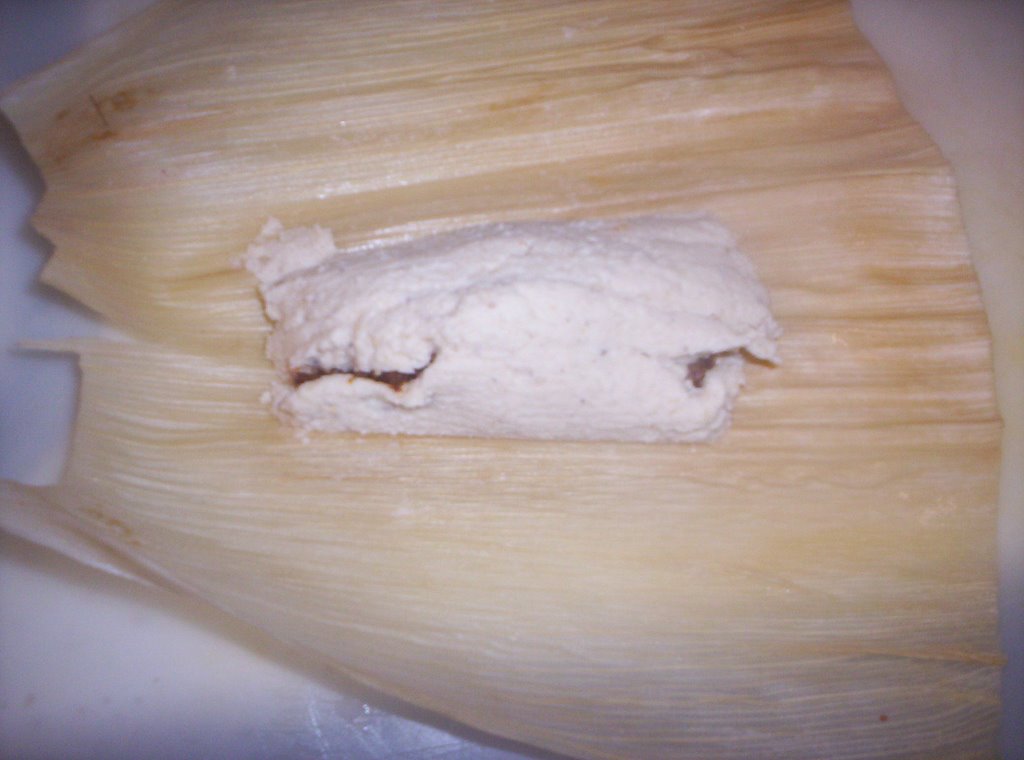

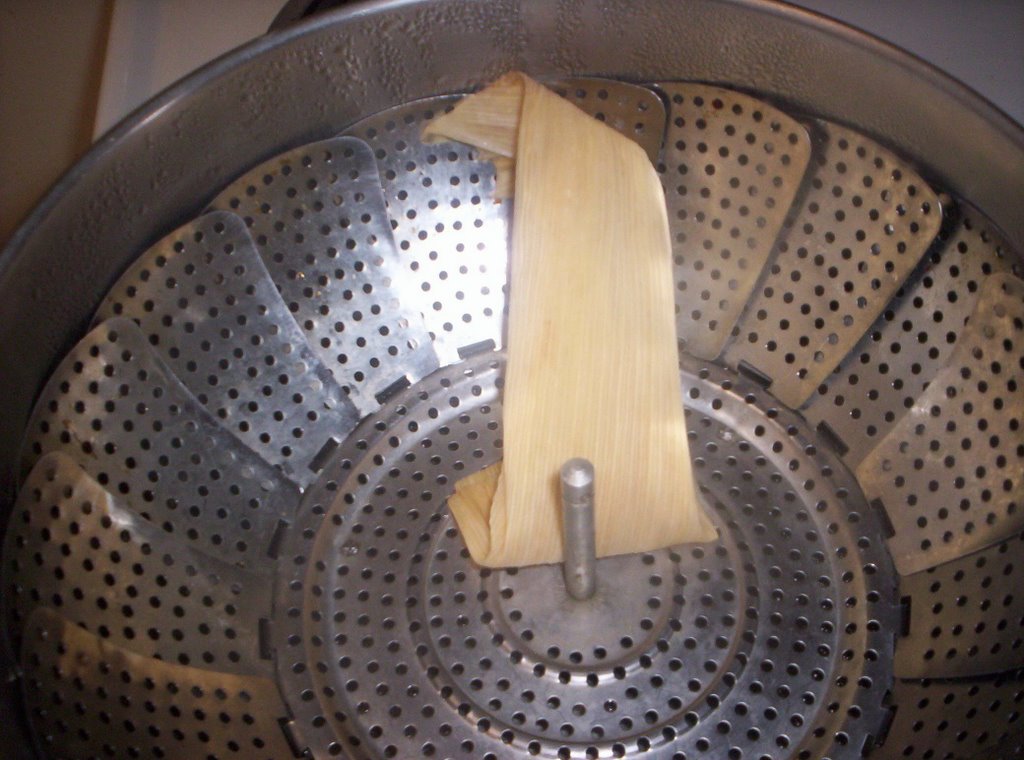
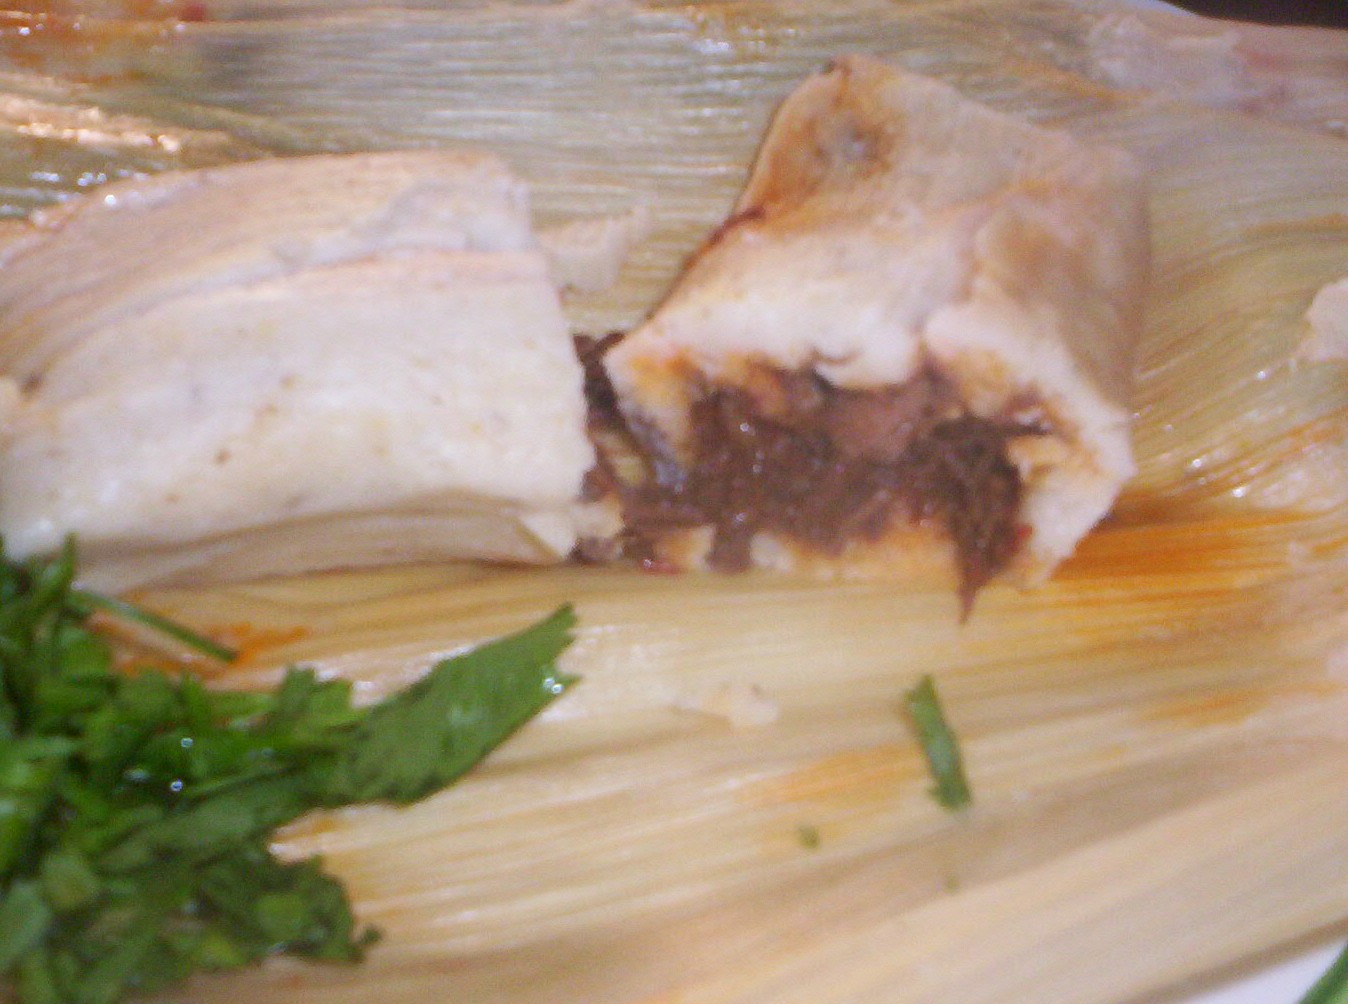
Beef Tamale Filling
You Will Need:
-1 1/2 lbs. beef (I used chuck, but any slow cooking meat will do fine) cubed.
-1/2 onion, sliced.
-5 cloves of garlic, peeled and smashed.
-2 teaspoons salt.
-1 tablespoon pepper
-1 tablespoon cumin
-4 tablespoons ground ancho chilies
-4 tablespoons shortening, or lard
Cut the meat into 2 inch chunks and brown with 2 tablespoons of shortening in a heavy bottomed pan. When brown, add enough water to cover meat. Add onions and garlic and simmer until tender-2-3 hours.
While the meat simmers, grind the chilies. When the meat is tender, separate the meat from broth reserving liquid, but straining out garlic and onion. Shred the meat.
Heat 2 tablespoons shortening in a heavy skillet (cast iron works great if you have one). Add the chilies and cumin and stir into a paste. Add the meat and fry 2-3 minutes. Add reserved broth and simmer until reduced. This will take at least an hour, so don't despair if it seems like the liquid is not reducing-it will. Resist the urge to boil it. The final mixture will have a somewhat liquid consistency.
Let cool while you prepare the masa, or make ahead and store tightly covered in the icebox. This recipe will make more than enough for a couple nights of tamales, or leftover can be used as a burrito filling.
Thursday, May 18, 2006
Pupusas Step By Step Illustrations
Of course, I messed-up posting in reverse (duh) so scroll down to the begining and read up. recipe follows pictures at bottom.

Subscribe to:
Posts (Atom)